Product Overview
The T722 is a hybrid-interface dual-monitor 2 PC KVM switch. It allows two computers to share two HDMI displays, one keyboard and mouse set, USB peripherals, audio devices, and a gigabit network connection. It supports independent display switching, mixed display use, front-panel button switching, keyboard hotkeys, and mouse-wheel switching.
Main Features
- Dual-PC dual-display output: Supports 2 computer inputs and 2 HDMI display outputs.
- 4K 60 Hz resolution: Supports up to 3840 × 2160 @ 60 Hz.
- MST technology: Supports MST technology, enabling dual-display output from a single USB Type-C signal source.
- Hybrid input connections: PC 2 uses HDMI, DP, and USB-B; PC 1 uses DP Alt Mode Type-C and a full-featured Type-C input.
- USB 3.2 Gen 1 expansion: Provides two front USB-A ports with a transfer rate of up to 5 Gbps.
- Dedicated keyboard and mouse ports: Provides rear USB-A keyboard and mouse ports using USB 1.1.
- Keyboard and mouse modes: Supports Transparent mode and Emulation mode for keyboard and mouse operation.
- Virtual display / Ghost function: Helps reduce window rearrangement and display re-detection during switching.
- Advanced shared functions: Supports mixed display mode, USB focus following, audio focus following, gigabit network sharing, audio output, and PC 1 100 W PD charging.
Package Contents
| Item | Quantity |
|---|---|
| T722 KVM Switch | 1 |
| DC 20V Power Adapter | 1 |
| USB Type-C Cable | 2 |
| USB Type-A to B Cable | 1 |
| User Manual | 1 |
Hardware Overview
Front Panel
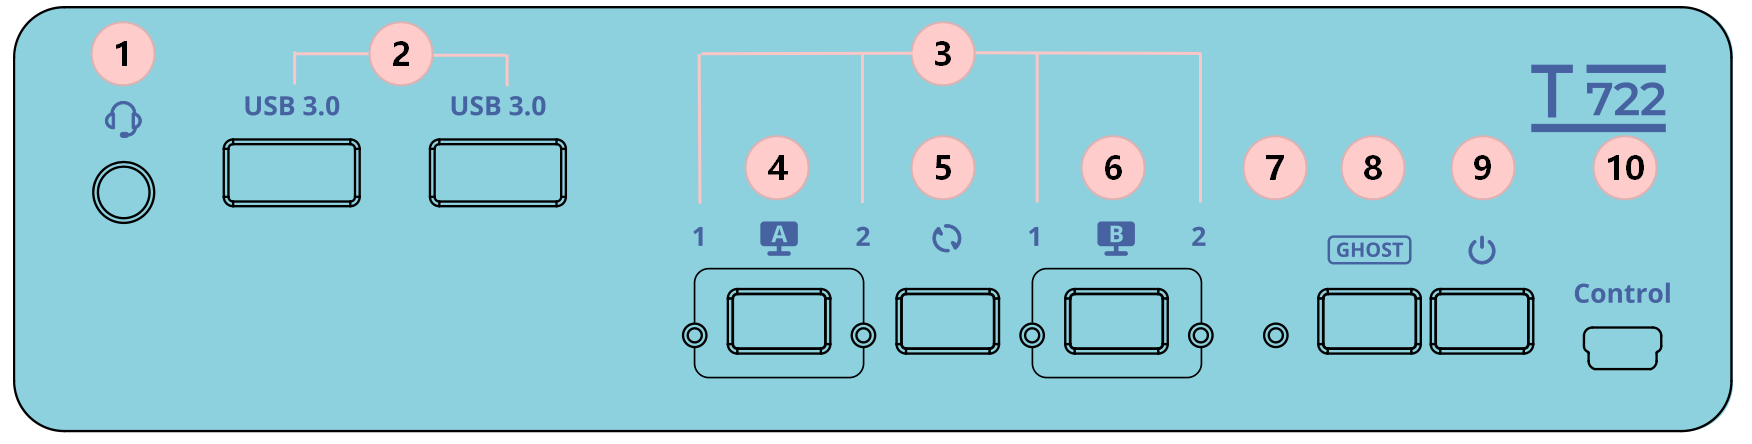
| No. | Name | Description |
|---|---|---|
| 1 | 3.5 mm audio / microphone jack | Connects headphones, speakers, or a microphone. |
| 2 | USB 3.2 Gen 1 ports | Connect USB peripherals such as storage devices or cameras; up to 5 Gbps; charging output 7.5 W, 5 V / 1.5 A. |
| 3 | Input selection status indicators | Show the current input channel status. |
| 4 | Monitor A input source button | Switches the video source shown on Monitor A. |
| 5 | Input source cycle button | Cycles the input source. |
| 6 | Monitor B input source button | Switches the video source shown on Monitor B. |
| 7 | Ghost function indicator | Shows the virtual display / Ghost function status. |
| 8 | Ghost button | Turns the virtual display / Ghost function on or off. |
| 9 | Power button | Press and hold to turn the KVM switch on or off. |
| 10 | Control port | Connects an external wired controller for control. The wired controller is sold separately. |
Rear Panel
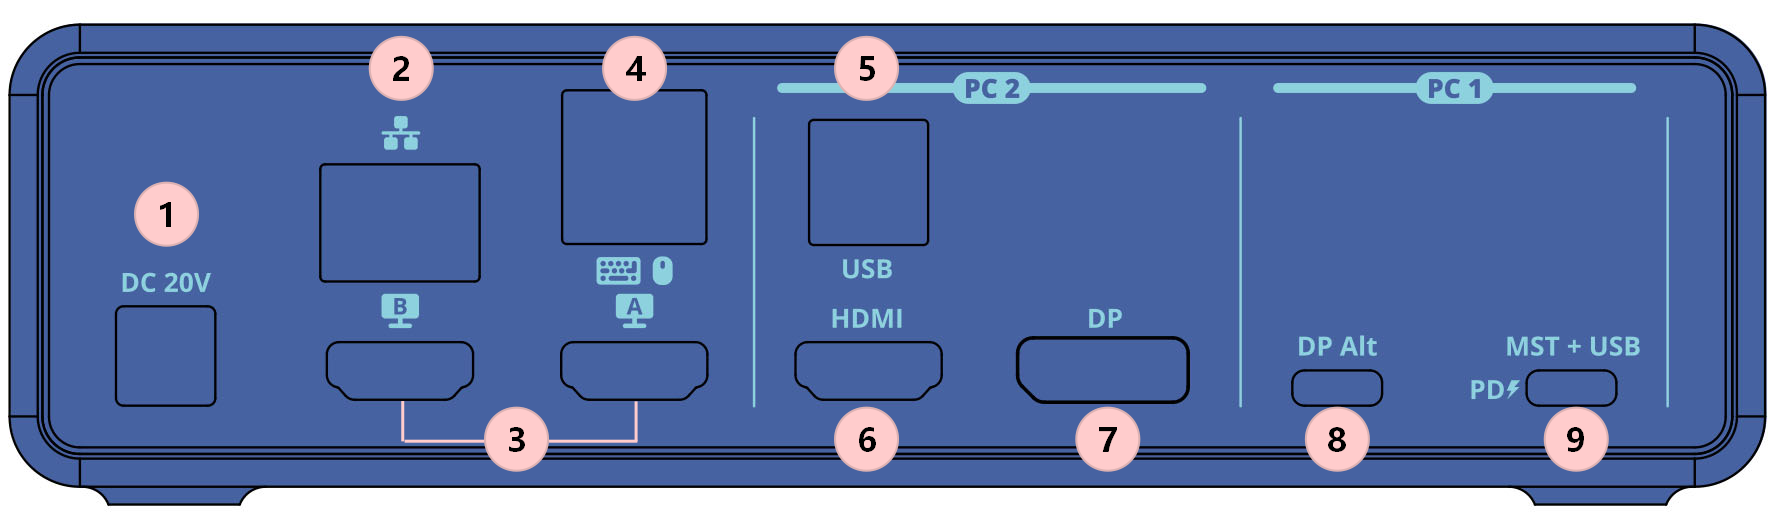
| No. | Name | Function |
|---|---|---|
| 1 | DC 20V power port | Connects the DC 20V / 7.5 A power adapter. |
| 2 | RJ45 gigabit network port | Connects to a router or network switch for gigabit network sharing. |
| 3 | HDMI output ports | Connect up to two HDMI displays. |
| 4 | Dedicated keyboard and mouse ports | Connect a keyboard and mouse; USB 1.1. |
| 5 | USB-B input port | Connects the USB data channel for PC 2. |
| 6 | HDMI input port | Connects the HDMI video input for PC 2. |
| 7 | DP input port | Connects the DP video input for PC 2. |
| 8 | DP Alt Mode input port | Connects the Type-C video input for PC 1. |
| 9 | Full-featured Type-C input port | Connects PC 1 for video and USB data, and supports 100 W PD charging. |
Quick Start Guide
Step 1: Physical Connection
Basic Connection
- Connect the two HDMI output ports on the rear panel to the HDMI inputs of the two displays.
- Connect the keyboard and mouse to the dedicated rear USB-A keyboard and mouse ports.
- Connect PC 2 to the HDMI input, DP input, and USB-B input according to the rear-panel PC 2 labels.
- Connect PC 1 to the DP Alt Mode Type-C input and the full-featured Type-C input according to the rear-panel PC 1 labels.
Note: Windows OS:
MST mode: Use 1 USB Type-C cable to connect the computer to the PC 1 input port labeled "MST+USB".
SST mode: Use 2 USB Type-C cables to connect the computer to the PC 1 input ports labeled "MST+USB" and "DP Alt" at the same time.
macOS:
Only SST mode is supported. Use 2 USB-C cables to connect the computer to the PC 1 input ports labeled "MST+USB" and "DP Alt" at the same time. - Connect the DC 20V power adapter to the KVM switch.
Optional Connection
- Connect USB peripherals to the front USB 3.2 Gen 1 ports if USB peripheral sharing is required.
- Connect headphones, speakers, or a microphone to the front 3.5 mm audio / microphone jack if audio is required.
- Connect the RJ45 port to a router or network switch if network sharing is required.
- Connect the optional wired controller to the Control port if wired controller operation is required. The wired controller is sold separately.
Step 2: Power-On Sequence
- Power on the displays.
- Power on the T722.
- Power on PC 1 and PC 2.
- Wait until the displays and USB devices are recognized by the computers.
- Use the front-panel indicators to confirm the current input status.
Step 3: Initial Configuration
- Use the front-panel Monitor A and Monitor B buttons to confirm that each display can switch between PC 1 and PC 2.
- If the desktop layout or resolution changes after switching, enable the virtual display / Ghost function with the front Ghost button or Right Ctrl + Right Ctrl + F5.
Basic Operation
| Function | Operation | Feedback |
|---|---|---|
| Switch Monitor A | Press the front-panel A button. | Monitor A switches to the next available PC source. |
| Switch Monitor B | Press the front-panel B button. | Monitor B switches to the next available PC source. |
| Cycle input source | Press the front-panel cycle button. | The input source cycles. |
| Hotkey switching | Press the default trigger key twice, then press the command key within 1 second. | The corresponding switching or function command is executed. |
| Mouse-wheel switching | Enable mouse-wheel switching, then use the mouse wheel action defined for switching. | The KVM switches the input as configured. |
| Wired controller | Connect the optional wired controller to the Control port and operate it. | The KVM can be controlled from the wired controller. The wired controller is sold separately. |
Basic Keyboard Shortcuts
Default hotkey rule: press Right Ctrl + Right Ctrl, then press the command key within 1 second.
| Shortcut | Function |
|---|---|
| Right Ctrl + Right Ctrl + F1 + new trigger key | Customize the hotkey trigger key. |
| Right Ctrl + Right Ctrl + F2 | Switch keyboard and mouse mode between Transparent mode and Emulation mode. |
| Right Ctrl + Right Ctrl + F4 | Turn the network adapter of the currently keyboard/mouse-controlled PC on or off. |
| Right Ctrl + Right Ctrl + F5 | Turn virtual display / Ghost function on or off. |
| Right Ctrl + Right Ctrl + F6 | Turn mouse middle-button / wheel switching on or off. |
| Right Ctrl + Right Ctrl + F11 | Adjust the buzzer volume level. |
| Right Ctrl + Right Ctrl + PgUp | Switch to the previous input port. |
| Right Ctrl + Right Ctrl + PgDn | Switch to the next input port. |
| Right Ctrl + Right Ctrl + 1 / 2 | Switch to PC 1 or PC 2. |
| Right Ctrl + Right Ctrl + ← | Switch the image displayed on Monitor A. |
| Right Ctrl + Right Ctrl + → | Switch the image displayed on Monitor B. |
| Right Alt + Right Alt | In mixed display mode, switch the PC controlled by the keyboard and mouse. |
| Right Ctrl + Right Ctrl + ~ | Turn follow mode on or off. |
| Right Ctrl + Right Ctrl + 0 | When follow mode is off, switch the PC assigned to audio and USB. |
Advanced Features
Keyboard and Mouse Modes
The T722 supports Transparent mode and Emulation mode.
- Transparent mode passes keyboard and mouse signals through to support special keyboard and mouse functions.
- Emulation mode maintains keyboard and mouse presence for smoother switching between PCs.
Use Right Ctrl + Right Ctrl + F2 to switch between Transparent mode and Emulation mode.
Virtual Display / Ghost Function
The virtual display / Ghost function helps keep display recognition information during switching or mixed display operation. This can reduce window rearrangement, resolution changes, or display re-detection.
- Press the front-panel Ghost button to turn this function on or off.
- Use Right Ctrl + Right Ctrl + F5 to turn this function on or off.
- The Ghost indicator shows the current function status.
Mixed Display Mode
Mixed display mode allows Monitor A and Monitor B to show images from different PCs at the same time. Switching one display does not automatically switch the keyboard and mouse control.
- Use the front-panel A or B button to switch the corresponding display.
- Use Right Ctrl + Right Ctrl + ← to switch Monitor A.
- Use Right Ctrl + Right Ctrl + → to switch Monitor B.
- Use Right Alt + Right Alt to switch the PC controlled by the keyboard and mouse in mixed display mode.
USB and Audio Focus Following
When follow mode is on, USB devices and audio follow the currently controlled PC.
- Use Right Ctrl + Right Ctrl + ~ to turn follow mode on or off.
- When follow mode is off, use Right Ctrl + Right Ctrl + 0 to switch the PC assigned to USB and audio.
- Do not switch while a USB storage device is reading or writing data.
Network Sharing
The RJ45 gigabit network port allows connected computers to share a network connection.
- Connect the RJ45 port to a router or network switch.
- Use Right Ctrl + Right Ctrl + F4 to turn the network adapter of the currently controlled PC on or off.
- Network sharing depends on USB data connection between the PC and the KVM switch.
Technical Specifications
| Item | Specification |
|---|---|
| Model | T722 |
| Product type | Hybrid-interface dual-monitor 2 PC KVM switch |
| Computer inputs | 2 PC |
| Display outputs | 2 HDMI |
| Maximum resolution | 3840 × 2160 @ 60 Hz |
| Maximum video transmission rate | 18 Gbps |
| PC 2 inputs | HDMI, DP, USB-B |
| PC 1 inputs | DP Alt Mode Type-C, full-featured Type-C |
| Front USB ports | USB 3.2 Gen 1, up to 5 Gbps |
| Keyboard / mouse ports | Dedicated USB-A ports, USB 1.1 |
| Audio | 3.5 mm audio / microphone jack, audio output supported |
| Network | RJ45 gigabit network, 1000 Mbps |
| Control | Control port supported; wired controller sold separately |
| Type-C charging | PC 1 full-featured Type-C input supports 100 W PD charging |
| Power input | DC 20V / 7.5 A |
| Dimensions | 187.3 × 115 × 51.7 mm |
| Operating temperature | 0°C to 55°C / 32°F to 131°F |
| Storage temperature | -20°C to 65°C / -4°F to 149°F |
| Humidity | 10% to 90%, non-condensing |
| ESD protection | Human-body model: ±8 kV air-gap discharge, ±4 kV contact discharge |
| Operating system compatibility | Unix, Windows, Debian, Ubuntu, Fedora, Mac OS X, Raspbian for Raspberry Pi, Ubuntu for Raspberry Pi, and other Linux-based systems |
Troubleshooting Guide
No Signal on Display
- Check that each display is connected to the HDMI output ports on the KVM switch.
- Check that the source computer is connected to the correct input ports according to the PC 1 or PC 2 labels.
- Confirm that the display input source is set to HDMI.
- Use a shorter or higher-quality HDMI / DP / Type-C cable if the screen flickers, goes black, or cannot remain stable.
- Confirm that the output resolution does not exceed 3840 × 2160 @ 60 Hz.
Keyboard or Mouse Not Responding
- Connect the keyboard and mouse to the dedicated rear USB-A keyboard and mouse ports.
- Make sure the USB data connection for the selected PC is connected correctly.
- Press Right Ctrl + Right Ctrl + F2 to switch between Transparent mode and Emulation mode.
- Reconnect the keyboard and mouse, then restart the KVM switch if needed.
USB Peripheral Problems
- Connect storage devices, cameras, and other USB peripherals to the USB 3.2 Gen 1 ports, not to the dedicated keyboard and mouse ports.
- Make sure the corresponding PC USB data connection is established.
- Avoid switching while a USB storage device is transferring data.
- For high-power USB devices, connect them directly to the computer or use a powered USB hub.
Audio Problems
- Make sure the relevant PC USB data connection is connected.
- Connect audio devices to the 3.5 mm audio / microphone jack.
- Select the corresponding USB audio device in the computer sound settings.
- If audio does not follow the intended PC, check follow mode with Right Ctrl + Right Ctrl + ~, or switch USB and audio assignment with Right Ctrl + Right Ctrl + 0 when follow mode is off.
Network Problems
- Connect the RJ45 port to a router or network switch.
- Make sure the PC USB data connection is connected correctly.
- Use Right Ctrl + Right Ctrl + F4 to turn the network adapter of the currently controlled PC on or off.
- If a computer prefers the KVM wired network over Wi-Fi, disable the USB network adapter in the operating system network settings or turn it off by hotkey.
Support
For technical support or after-sales service, prepare the model number, connection diagram, computer operating systems, display models, cable types, and a clear description of the issue.
- Technical support email: support@tesmert.com
- After-sales email: support@tesmert.com
- Website: www.tesmert.com
Produktübersicht
Der T722 ist ein Dual-Monitor-KVM-Umschalter mit gemischten Schnittstellen für 2 PCs. Er ermöglicht es zwei Computern, zwei HDMI-Monitore, eine Tastatur-Maus-Kombination, USB-Peripheriegeräte, Audiogeräte und eine Gigabit-Netzwerkverbindung gemeinsam zu nutzen. Er unterstützt unabhängiges Umschalten der Monitore, gemischte Anzeige, Umschalten über Fronttasten, Tastenkombinationen und Mausrad-Umschaltung.
Hauptmerkmale
- Zwei PCs und zwei Displays: Unterstützt 2 Computereingänge und 2 HDMI-Monitorausgänge.
- 4K 60 Hz Auflösung: Unterstützt bis zu 3840 × 2160 @ 60 Hz.
- MST-Technologie: Unterstützt MST-Technologie, sodass die Dual-Display-Ausgabe über eine einzige USB-Type-C-Signalquelle möglich ist.
- Gemischte Einganganschlüsse: PC 2 verwendet HDMI, DP und USB-B; PC 1 verwendet DP Alt Mode Type-C und einen vollwertigen Type-C-Eingang.
- USB 3.2 Gen 1 Erweiterung: Bietet zwei vordere USB-A-Anschlüsse mit einer Übertragungsrate von bis zu 5 Gbps.
- Dedizierte Tastatur- und Mausanschlüsse: Bietet rückseitige USB-A-Anschlüsse für Tastatur und Maus mit USB 1.1.
- Tastatur- und Mausmodi: Unterstützt transparenten Modus und Emulationsmodus für die Tastatur- und Mausbedienung.
- Virtuelle Anzeige / Ghost-Funktion: Reduziert Fensterneuanordnung und erneute Monitorerkennung beim Umschalten.
- Erweiterte gemeinsame Funktionen: Unterstützt gemischte Anzeige, USB-Fokus-Folgen, Audio-Fokus-Folgen, Gigabit-Netzwerkfreigabe, Audioausgabe und 100 W PD-Laden für PC 1.
Packungsinhalt
| Artikel | Menge |
|---|---|
| T722 KVM-Umschalter | 1 |
| DC 20V Netzteil | 1 |
| USB-Type-C-Kabel | 2 |
| USB-Type-A-auf-Type-B-Kabel | 1 |
| Benutzerhandbuch | 1 |
Hardware-Übersicht
Vorderseite
| Nr. | Name | Beschreibung |
|---|---|---|
| 1 | 3,5-mm-Audio-/Mikrofonbuchse | Zum Anschließen von Kopfhörern, Lautsprechern oder Mikrofon. |
| 2 | USB 3.2 Gen 1 Anschlüsse | Zum Anschließen von USB-Peripheriegeräten wie Speichermedien oder Kameras; bis zu 5 Gbps; Ladeleistung 7,5 W, 5 V / 1,5 A. |
| 3 | Statusanzeigen für Eingangsauswahl | Zeigen den aktuellen Status des Eingangskanals an. |
| 4 | Eingangswahltaste für Monitor A | Schaltet die auf Monitor A angezeigte Videoquelle um. |
| 5 | Taste zum zyklischen Umschalten der Eingangsquelle | Schaltet die Eingangsquelle zyklisch weiter. |
| 6 | Eingangswahltaste für Monitor B | Schaltet die auf Monitor B angezeigte Videoquelle um. |
| 7 | Anzeige der Ghost-Funktion | Zeigt den Status der virtuellen Anzeige / Ghost-Funktion an. |
| 8 | Ghost-Taste | Schaltet die virtuelle Anzeige / Ghost-Funktion ein oder aus. |
| 9 | Ein-/Austaste | Gedrückt halten, um den KVM-Umschalter ein- oder auszuschalten. |
| 10 | Control-Anschluss | Zum Anschließen eines externen kabelgebundenen Controllers. Der kabelgebundene Controller ist separat erhältlich. |
Rückseite
| Nr. | Name | Funktion |
|---|---|---|
| 1 | DC 20V-Stromanschluss | Zum Anschließen des DC 20V / 7,5 A Netzteils. |
| 2 | RJ45-Gigabit-Netzwerkanschluss | Zum Anschließen an einen Router oder Netzwerk-Switch für die Gigabit-Netzwerkfreigabe. |
| 3 | HDMI-Ausgänge | Zum Anschließen von bis zu zwei HDMI-Monitoren. |
| 4 | Dedizierte Tastatur- und Mausanschlüsse | Zum Anschließen von Tastatur und Maus; USB 1.1. |
| 5 | USB-B-Eingang | Stellt den USB-Datenkanal für PC 2 bereit. |
| 6 | HDMI-Eingang | Zum Anschließen des HDMI-Videoeingangs für PC 2. |
| 7 | DP-Eingang | Zum Anschließen des DP-Videoeingangs für PC 2. |
| 8 | DP Alt Mode Eingang | Zum Anschließen des Type-C-Videoeingangs für PC 1. |
| 9 | Vollwertiger Type-C-Eingang | Zum Anschließen von PC 1 für Video und USB-Daten; unterstützt 100 W PD-Laden. |
Kurzanleitung
Schritt 1: Physischer Anschluss
Grundlegende Verbindungen
- Verbinden Sie die beiden HDMI-Ausgänge auf der Rückseite mit den HDMI-Eingängen der beiden Monitore.
- Schließen Sie Tastatur und Maus an die dedizierten rückseitigen USB-A-Anschlüsse für Tastatur und Maus an.
- Verbinden Sie PC 2 gemäß den Beschriftungen für PC 2 auf der Rückseite mit HDMI-Eingang, DP-Eingang und USB-B-Eingang.
- Verbinden Sie PC 1 gemäß den Beschriftungen für PC 1 auf der Rückseite mit dem DP Alt Mode Type-C-Eingang und dem vollwertigen Type-C-Eingang.
Hinweis: Windows OS:
MST-Modus: Verwenden Sie 1 USB-Type-C-Kabel, um den Computer mit dem PC 1 Eingangsanschluss mit der Beschriftung "MST+USB" zu verbinden.
SST-Modus: Verwenden Sie 2 USB-Type-C-Kabel, um den Computer gleichzeitig mit den PC 1 Eingangsanschlüssen mit den Beschriftungen "MST+USB" und "DP Alt" zu verbinden.
macOS:
Es wird nur der SST-Modus unterstützt. Verwenden Sie 2 USB-C-Kabel, um den Computer gleichzeitig mit den PC 1 Eingangsanschlüssen mit den Beschriftungen "MST+USB" und "DP Alt" zu verbinden. - Schließen Sie das DC 20V Netzteil an den KVM-Umschalter an.
Optionale Verbindungen
- Schließen Sie USB-Peripheriegeräte an die vorderen USB 3.2 Gen 1 Anschlüsse an, wenn USB-Peripheriegeräte gemeinsam genutzt werden sollen.
- Schließen Sie bei Bedarf Kopfhörer, Lautsprecher oder ein Mikrofon an die vordere 3,5-mm-Audio-/Mikrofonbuchse an.
- Verbinden Sie den RJ45-Anschluss mit einem Router oder Netzwerk-Switch, wenn die Netzwerkfreigabe benötigt wird.
- Schließen Sie den optionalen kabelgebundenen Controller an den Control-Anschluss an, wenn die Bedienung per kabelgebundenem Controller benötigt wird. Der kabelgebundene Controller ist separat erhältlich.
Schritt 2: Einschaltreihenfolge
- Schalten Sie die Monitore ein.
- Schalten Sie den T722 ein.
- Schalten Sie PC 1 und PC 2 ein.
- Warten Sie, bis Monitore und USB-Geräte von den Computern erkannt werden.
- Prüfen Sie den aktuellen Eingangsstatus über die Anzeigen an der Vorderseite.
Schritt 3: Erstkonfiguration
- Verwenden Sie die Tasten Monitor A und Monitor B an der Vorderseite, um zu prüfen, ob jeder Monitor zwischen PC 1 und PC 2 umschalten kann.
- Wenn sich Desktop-Anordnung oder Auflösung nach dem Umschalten ändern, aktivieren Sie die virtuelle Anzeige / Ghost-Funktion über die Ghost-Taste an der Vorderseite oder mit Right Ctrl + Right Ctrl + F5.
Grundlegende Bedienung
| Funktion | Bedienung | Rückmeldung |
|---|---|---|
| Monitor A umschalten | Drücken Sie die Taste A an der Vorderseite. | Monitor A wechselt zur nächsten verfügbaren PC-Quelle. |
| Monitor B umschalten | Drücken Sie die Taste B an der Vorderseite. | Monitor B wechselt zur nächsten verfügbaren PC-Quelle. |
| Eingangsquelle zyklisch umschalten | Drücken Sie die zyklische Taste an der Vorderseite. | Die Eingangsquelle wird zyklisch weitergeschaltet. |
| Umschalten per Tastenkombination | Drücken Sie die Standard-Auslösetaste zweimal und anschließend innerhalb von 1 Sekunde die Befehlstaste. | Der entsprechende Umschalt- oder Funktionsbefehl wird ausgeführt. |
| Mausrad-Umschaltung | Aktivieren Sie die Mausrad-Umschaltung und verwenden Sie dann die dafür vorgesehene Mausradaktion. | Der KVM-Umschalter wechselt den Eingang entsprechend der Einstellung. |
| Kabelgebundener Controller | Schließen Sie den optionalen kabelgebundenen Controller an den Control-Anschluss an und bedienen Sie ihn. | Der KVM-Umschalter kann über den kabelgebundenen Controller gesteuert werden. Der kabelgebundene Controller ist separat erhältlich. |
Grundlegende Tastenkombinationen
Standardregel: Drücken Sie Right Ctrl + Right Ctrl und anschließend innerhalb von 1 Sekunde die Befehlstaste.
| Tastenkombination | Funktion |
|---|---|
| Right Ctrl + Right Ctrl + F1 + neue Auslösetaste | Hotkey-Auslösetaste anpassen. |
| Right Ctrl + Right Ctrl + F2 | Tastatur- und Mausmodus zwischen transparentem Modus und Emulationsmodus umschalten. |
| Right Ctrl + Right Ctrl + F4 | Netzwerkadapter des aktuell von Tastatur und Maus gesteuerten PCs ein- oder ausschalten. |
| Right Ctrl + Right Ctrl + F5 | Virtuelle Anzeige / Ghost-Funktion ein- oder ausschalten. |
| Right Ctrl + Right Ctrl + F6 | Mausrad- / Mitteltasten-Umschaltung ein- oder ausschalten. |
| Right Ctrl + Right Ctrl + F11 | Lautstärkestufe des Summers anpassen. |
| Right Ctrl + Right Ctrl + PgUp | Zum vorherigen Eingangsport wechseln. |
| Right Ctrl + Right Ctrl + PgDn | Zum nächsten Eingangsport wechseln. |
| Right Ctrl + Right Ctrl + 1 / 2 | Zu PC 1 oder PC 2 wechseln. |
| Right Ctrl + Right Ctrl + ← | Das auf Monitor A angezeigte Bild umschalten. |
| Right Ctrl + Right Ctrl + → | Das auf Monitor B angezeigte Bild umschalten. |
| Right Alt + Right Alt | Im gemischten Anzeigemodus den von Tastatur und Maus gesteuerten PC wechseln. |
| Right Ctrl + Right Ctrl + ~ | Folgemodus ein- oder ausschalten. |
| Right Ctrl + Right Ctrl + 0 | Wenn der Folgemodus ausgeschaltet ist, den PC für Audio und USB umschalten. |
Erweiterte Funktionen
Tastatur- und Mausmodi
Der T722 unterstützt transparenten Modus und Emulationsmodus.
- Im transparentem Modus werden Tastatur- und Maussignale direkt durchgereicht, um Sonderfunktionen bestimmter Tastaturen und Mäuse besser zu unterstützen.
- Im Emulationsmodus bleibt die Tastatur- und Mauspräsenz erhalten, damit das Umschalten zwischen PCs reibungsloser erfolgt.
Verwenden Sie Right Ctrl + Right Ctrl + F2, um zwischen transparentem Modus und Emulationsmodus umzuschalten.
Virtuelle Anzeige / Ghost-Funktion
Die virtuelle Anzeige / Ghost-Funktion hilft, Monitorerkennungsinformationen beim Umschalten oder bei gemischter Anzeige beizubehalten. Dadurch können Fensterneuanordnung, Auflösungsänderungen und erneute Monitorerkennung reduziert werden.
- Drücken Sie die Ghost-Taste an der Vorderseite, um die Funktion ein- oder auszuschalten.
- Verwenden Sie Right Ctrl + Right Ctrl + F5, um die Funktion ein- oder auszuschalten.
- Die Ghost-Anzeige zeigt den aktuellen Funktionsstatus.
Gemischter Anzeigemodus
Der gemischte Anzeigemodus ermöglicht es Monitor A und Monitor B, gleichzeitig Bilder von unterschiedlichen PCs anzuzeigen. Das Umschalten eines einzelnen Monitors schaltet die Steuerung durch Tastatur und Maus nicht automatisch um.
- Verwenden Sie die Fronttaste A oder B, um den entsprechenden Monitor umzuschalten.
- Verwenden Sie Right Ctrl + Right Ctrl + ←, um Monitor A umzuschalten.
- Verwenden Sie Right Ctrl + Right Ctrl + →, um Monitor B umzuschalten.
- Verwenden Sie Right Alt + Right Alt, um im gemischten Anzeigemodus den von Tastatur und Maus gesteuerten PC zu wechseln.
USB- und Audio-Fokus-Folgen
Wenn der Folgemodus eingeschaltet ist, folgen USB-Geräte und Audio dem aktuell gesteuerten PC.
- Verwenden Sie Right Ctrl + Right Ctrl + ~, um den Folgemodus ein- oder auszuschalten.
- Wenn der Folgemodus ausgeschaltet ist, verwenden Sie Right Ctrl + Right Ctrl + 0, um den PC für USB und Audio umzuschalten.
- Schalten Sie nicht um, während ein USB-Speichergerät Daten liest oder schreibt.
Netzwerkfreigabe
Der RJ45-Gigabit-Netzwerkanschluss ermöglicht es den angeschlossenen Computern, eine Netzwerkverbindung gemeinsam zu nutzen.
- Verbinden Sie den RJ45-Anschluss mit einem Router oder Netzwerk-Switch.
- Verwenden Sie Right Ctrl + Right Ctrl + F4, um den Netzwerkadapter des aktuell gesteuerten PCs ein- oder auszuschalten.
- Die Netzwerkfreigabe hängt von der USB-Datenverbindung zwischen PC und KVM-Umschalter ab.
Technische Spezifikationen
| Element | Spezifikation |
|---|---|
| Modell | T722 |
| Produkttyp | Dual-Monitor-KVM-Umschalter mit gemischten Schnittstellen für 2 PCs |
| Computereingänge | 2 PC |
| Monitorausgänge | 2 HDMI |
| Maximale Auflösung | 3840 × 2160 @ 60 Hz |
| Maximale Videoübertragungsrate | 18 Gbps |
| Eingänge für PC 2 | HDMI, DP, USB-B |
| Eingänge für PC 1 | DP Alt Mode Type-C, vollwertiger Type-C |
| Vordere USB-Anschlüsse | USB 3.2 Gen 1, bis zu 5 Gbps |
| Tastatur-/Mausanschlüsse | Dedizierte USB-A-Anschlüsse, USB 1.1 |
| Audio | 3,5-mm-Audio-/Mikrofonbuchse, Audioausgabe unterstützt |
| Netzwerk | RJ45-Gigabit-Netzwerk, 1000 Mbps |
| Control | Control-Anschluss unterstützt; kabelgebundener Controller separat erhältlich |
| Type-C-Laden | Vollwertiger Type-C-Eingang für PC 1 unterstützt 100 W PD-Laden |
| Stromeingang | DC 20V / 7,5 A |
| Abmessungen | 187,3 × 115 × 51,7 mm |
| Betriebstemperatur | 0°C bis 55°C / 32°F bis 131°F |
| Lagertemperatur | -20°C bis 65°C / -4°F bis 149°F |
| Luftfeuchtigkeit | 10% bis 90%, nicht kondensierend |
| ESD-Schutz | Human-Body-Modell: ±8 kV Luftentladung, ±4 kV Kontaktentladung |
| Betriebssystemkompatibilität | Unix, Windows, Debian, Ubuntu, Fedora, Mac OS X, Raspbian für Raspberry Pi, Ubuntu für Raspberry Pi und andere Linux-basierte Systeme |
Anleitung zur Fehlerbehebung
Kein Signal auf dem Monitor
- Prüfen Sie, ob jeder Monitor mit den HDMI-Ausgängen des KVM-Umschalters verbunden ist.
- Prüfen Sie, ob der Quellcomputer gemäß den Beschriftungen PC 1 oder PC 2 mit den richtigen Eingängen verbunden ist.
- Stellen Sie sicher, dass am Monitor HDMI als Eingangsquelle ausgewählt ist.
- Verwenden Sie ein kürzeres oder hochwertigeres HDMI-, DP- oder Type-C-Kabel, wenn der Bildschirm flackert, schwarz wird oder nicht stabil bleibt.
- Stellen Sie sicher, dass die Ausgabeauflösung 3840 × 2160 @ 60 Hz nicht überschreitet.
Tastatur oder Maus reagiert nicht
- Schließen Sie Tastatur und Maus an die dedizierten rückseitigen USB-A-Anschlüsse für Tastatur und Maus an.
- Stellen Sie sicher, dass die USB-Datenverbindung für den ausgewählten PC korrekt verbunden ist.
- Drücken Sie Right Ctrl + Right Ctrl + F2, um zwischen transparentem Modus und Emulationsmodus umzuschalten.
- Schließen Sie Tastatur und Maus erneut an und starten Sie den KVM-Umschalter bei Bedarf neu.
Probleme mit USB-Peripheriegeräten
- Schließen Sie Speichermedien, Kameras und andere USB-Peripheriegeräte an die USB 3.2 Gen 1 Anschlüsse an, nicht an die dedizierten Tastatur- und Mausanschlüsse.
- Stellen Sie sicher, dass die entsprechende USB-Datenverbindung des PCs hergestellt ist.
- Schalten Sie nicht um, während ein USB-Speichergerät Daten überträgt.
- Schließen Sie Geräte mit hohem Strombedarf direkt an den Computer an oder verwenden Sie einen USB-Hub mit eigener Stromversorgung.
Audioprobleme
- Stellen Sie sicher, dass die USB-Datenverbindung des betreffenden PCs verbunden ist.
- Schließen Sie Audiogeräte an die 3,5-mm-Audio-/Mikrofonbuchse an.
- Wählen Sie in den Audioeinstellungen des Computers das entsprechende USB-Audiogerät aus.
- Wenn Audio nicht dem gewünschten PC folgt, prüfen Sie den Folgemodus mit Right Ctrl + Right Ctrl + ~ oder schalten Sie bei ausgeschaltetem Folgemodus die USB- und Audiozuordnung mit Right Ctrl + Right Ctrl + 0 um.
Netzwerkprobleme
- Verbinden Sie den RJ45-Anschluss mit einem Router oder Netzwerk-Switch.
- Stellen Sie sicher, dass die USB-Datenverbindung des PCs korrekt verbunden ist.
- Verwenden Sie Right Ctrl + Right Ctrl + F4, um den Netzwerkadapter des aktuell gesteuerten PCs ein- oder auszuschalten.
- Wenn ein Computer die kabelgebundene KVM-Netzwerkverbindung gegenüber WLAN bevorzugt, deaktivieren Sie den USB-Netzwerkadapter in den Netzwerkeinstellungen des Betriebssystems oder schalten Sie ihn per Hotkey aus.
Support
Halten Sie für technischen Support oder Kundendienst Modellnummer, Anschlussübersicht, Betriebssysteme der Computer, Monitormodelle, Kabeltypen und eine klare Fehlerbeschreibung bereit.
- E-Mail für technischen Support: support@tesmert.com
- Kundendienst-E-Mail: support@tesmert.com
- Website: www.tesmert.com
製品概要
T722 は、2 台の PC に対応した混合インターフェースのデュアルモニター KVM 切替器です。2 台のコンピューターで、2 台の HDMI ディスプレイ、1 組のキーボードとマウス、USB 周辺機器、オーディオ機器、ギガビットネットワーク接続を共有できます。各ディスプレイの個別切替、混在表示、前面ボタン切替、キーボードショートカット、マウスホイール切替に対応します。
主な特長
- 2 台 PC・2 画面出力:2 台のコンピューター入力と 2 系統の HDMI ディスプレイ出力に対応。
- 4K 60 Hz 解像度:最大 3840 × 2160 @ 60 Hz に対応。
- MST 技術:MST 技術に対応し、単一の USB Type-C 信号ソースだけでデュアルディスプレイ表示が可能です。
- 混合入力接続:PC 2 は HDMI、DP、USB-B を使用し、PC 1 は DP Alt Mode Type-C とフル機能 Type-C 入力を使用。
- USB 3.2 Gen 1 拡張:前面に USB-A ポートを 2 基搭載し、最大 5 Gbps の転送速度に対応。
- キーボード・マウス専用ポート:背面にキーボード・マウス専用の USB-A ポートを搭載し、USB 1.1 に対応。
- キーボード・マウスモード:操作モードとして、透過モードとエミュレーションモードに対応。
- 仮想ディスプレイ / Ghost 機能:切替時のウィンドウ再配置やディスプレイ再認識を軽減します。
- 高度な共有機能:混在表示モード、USB フォーカス追従、オーディオフォーカス追従、ギガビットネットワーク共有、オーディオ出力、PC 1 の 100 W PD 充電に対応。
パッケージ内容
| 内容物 | 数量 |
|---|---|
| T722 KVM 切替器 | 1 |
| DC 20V 電源アダプター | 1 |
| USB Type-C ケーブル | 2 |
| USB Type-A to B ケーブル | 1 |
| ユーザーマニュアル | 1 |
ハードウェア概要
前面パネル
| 番号 | 名称 | 説明 |
|---|---|---|
| 1 | 3.5 mm オーディオ / マイク端子 | ヘッドホン、スピーカー、マイクを接続します。 |
| 2 | USB 3.2 Gen 1 ポート | ストレージ機器やカメラなどの USB 周辺機器を接続します。最大 5 Gbps、充電出力 7.5 W、5 V / 1.5 A。 |
| 3 | 入力選択ステータスインジケーター | 現在の入力チャンネル状態を表示します。 |
| 4 | モニター A 入力ソース選択ボタン | モニター A に表示する映像ソースを切り替えます。 |
| 5 | 入力ソース循環切替ボタン | 入力ソースを順番に切り替えます。 |
| 6 | モニター B 入力ソース選択ボタン | モニター B に表示する映像ソースを切り替えます。 |
| 7 | Ghost 機能インジケーター | 仮想ディスプレイ / Ghost 機能の状態を表示します。 |
| 8 | Ghost ボタン | 仮想ディスプレイ / Ghost 機能をオンまたはオフにします。 |
| 9 | 電源ボタン | 長押しして KVM 切替器の電源をオンまたはオフにします。 |
| 10 | Control ポート | 外部有線コントローラーを接続して操作します。有線コントローラーは別売です。 |
背面パネル
| 番号 | 名称 | 機能 |
|---|---|---|
| 1 | DC 20V 電源ポート | DC 20V / 7.5 A 電源アダプターを接続します。 |
| 2 | RJ45 ギガビットネットワークポート | ルーターまたはネットワークスイッチに接続し、ギガビットネットワーク共有を行います。 |
| 3 | HDMI 出力ポート | 最大 2 台の HDMI ディスプレイを接続します。 |
| 4 | キーボード・マウス専用ポート | キーボードとマウスを接続します。USB 1.1。 |
| 5 | USB-B 入力ポート | PC 2 の USB データチャンネルを接続します。 |
| 6 | HDMI 入力ポート | PC 2 の HDMI 映像入力を接続します。 |
| 7 | DP 入力ポート | PC 2 の DP 映像入力を接続します。 |
| 8 | DP Alt Mode 入力ポート | PC 1 の Type-C 映像入力を接続します。 |
| 9 | フル機能 Type-C 入力 | PC 1 の映像と USB データを接続し、100 W PD 充電に対応します。 |
クイックスタートガイド
ステップ 1:物理接続
基本接続
- 背面の 2 つの HDMI 出力ポートを、2 台のディスプレイの HDMI 入力に接続します。
- キーボードとマウスを、背面のキーボード・マウス専用 USB-A ポートに接続します。
- 背面の PC 2 表示に従って、PC 2 を HDMI 入力、DP 入力、USB-B 入力に接続します。
- 背面の PC 1 表示に従って、PC 1 を DP Alt Mode Type-C 入力とフル機能 Type-C 入力に接続します。
注記: Windows OS:
MST モード:1 本の USB Type-C ケーブルを使用し、コンピューターを PC 1 の "MST+USB" と表示された入力ポートに接続します。
SST モード:2 本の USB Type-C ケーブルを使用し、コンピューターを PC 1 の "MST+USB" と "DP Alt" と表示された入力ポートに同時に接続します。
macOS:
SST モードのみ対応します。2 本の USB-C ケーブルを使用し、コンピューターを PC 1 の "MST+USB" と "DP Alt" と表示された入力ポートに同時に接続します。 - DC 20V 電源アダプターを KVM 切替器に接続します。
オプション接続
- USB 周辺機器を共有する場合は、前面の USB 3.2 Gen 1 ポートに接続します。
- オーディオを使用する場合は、ヘッドホン、スピーカー、またはマイクを前面の 3.5 mm オーディオ / マイク端子に接続します。
- ネットワーク共有を使用する場合は、RJ45 ポートをルーターまたはネットワークスイッチに接続します。
- 有線コントローラーで操作する場合は、オプションの有線コントローラーを Control ポートに接続します。有線コントローラーは別売です。
ステップ 2:電源投入手順
- ディスプレイの電源を入れます。
- T722 の電源を入れます。
- PC 1 と PC 2 の電源を入れます。
- ディスプレイと USB 機器がコンピューターに認識されるまで待ちます。
- 前面インジケーターで現在の入力状態を確認します。
ステップ 3:初期設定
- 前面のモニター A / モニター B ボタンを使用して、各ディスプレイが PC 1 と PC 2 の間で切り替わることを確認します。
- 切替後にデスクトップの配置や解像度が変わる場合は、前面の Ghost ボタンまたは Right Ctrl + Right Ctrl + F5 で仮想ディスプレイ / Ghost 機能を有効にします。
基本操作
| 機能 | 操作 | フィードバック |
|---|---|---|
| モニター A を切り替える | 前面の A ボタンを押します。 | モニター A が次の利用可能な PC ソースに切り替わります。 |
| モニター B を切り替える | 前面の B ボタンを押します。 | モニター B が次の利用可能な PC ソースに切り替わります。 |
| 入力ソースを循環切替する | 前面の循環切替ボタンを押します。 | 入力ソースが順番に切り替わります。 |
| キーボードショートカットで切り替える | 標準トリガーキーを 2 回押し、1 秒以内にコマンドキーを押します。 | 対応する切替または機能コマンドが実行されます。 |
| マウスホイール切替 | マウスホイール切替を有効にし、指定されたマウスホイール操作を行います。 | 設定に従って KVM 入力が切り替わります。 |
| 有線コントローラー | オプションの有線コントローラーを Control ポートに接続して操作します。 | 有線コントローラーから KVM を操作できます。有線コントローラーは別売です。 |
基本ショートカットキー
標準ルール:Right Ctrl + Right Ctrl を押してから、1 秒以内にコマンドキーを押します。
| ショートカット | 機能 |
|---|---|
| Right Ctrl + Right Ctrl + F1 + 新しいトリガーキー | ホットキートリガーキーをカスタマイズします。 |
| Right Ctrl + Right Ctrl + F2 | キーボード・マウスモードを透過モードとエミュレーションモードの間で切り替えます。 |
| Right Ctrl + Right Ctrl + F4 | 現在キーボードとマウスで操作している PC のネットワークアダプターをオンまたはオフにします。 |
| Right Ctrl + Right Ctrl + F5 | 仮想ディスプレイ / Ghost 機能をオンまたはオフにします。 |
| Right Ctrl + Right Ctrl + F6 | マウス中ボタン / ホイール切替をオンまたはオフにします。 |
| Right Ctrl + Right Ctrl + F11 | ブザー音量レベルを調整します。 |
| Right Ctrl + Right Ctrl + PgUp | 前の入力ポートに切り替えます。 |
| Right Ctrl + Right Ctrl + PgDn | 次の入力ポートに切り替えます。 |
| Right Ctrl + Right Ctrl + 1 / 2 | PC 1 または PC 2 に切り替えます。 |
| Right Ctrl + Right Ctrl + ← | モニター A に表示される映像を切り替えます。 |
| Right Ctrl + Right Ctrl + → | モニター B に表示される映像を切り替えます。 |
| Right Alt + Right Alt | 混在表示モードで、キーボードとマウスが操作する PC を切り替えます。 |
| Right Ctrl + Right Ctrl + ~ | 追従モードをオンまたはオフにします。 |
| Right Ctrl + Right Ctrl + 0 | 追従モードがオフのとき、オーディオと USB が割り当てられる PC を切り替えます。 |
高度な機能
キーボード・マウスモード
T722 は、透過モードとエミュレーションモードに対応しています。
- 透過モードでは、キーボードとマウスの信号をそのまま通過させ、特殊機能付きのキーボードやマウスをより適切にサポートします。
- エミュレーションモードでは、キーボードとマウスの接続状態を維持し、PC 間の切替をよりスムーズにします。
Right Ctrl + Right Ctrl + F2 で、透過モードとエミュレーションモードを切り替えます。
仮想ディスプレイ / Ghost 機能
仮想ディスプレイ / Ghost 機能は、切替時または混在表示時にディスプレイ認識情報を保持するための機能です。ウィンドウの再配置、解像度変更、ディスプレイの再認識を軽減できます。
- 前面の Ghost ボタンを押して、この機能をオンまたはオフにします。
- Right Ctrl + Right Ctrl + F5 で、この機能をオンまたはオフにします。
- Ghost インジケーターが現在の機能状態を表示します。
混在表示モード
混在表示モードでは、モニター A とモニター B に異なる PC の映像を同時に表示できます。片方のディスプレイだけを切り替えても、キーボードとマウスの操作対象は自動的には切り替わりません。
- 前面の A または B ボタンで、対応するディスプレイを切り替えます。
- Right Ctrl + Right Ctrl + ← でモニター A を切り替えます。
- Right Ctrl + Right Ctrl + → でモニター B を切り替えます。
- Right Alt + Right Alt で、混在表示モード中にキーボードとマウスが操作する PC を切り替えます。
USB とオーディオのフォーカス追従
追従モードがオンのとき、USB 機器とオーディオは現在操作中の PC に追従します。
- Right Ctrl + Right Ctrl + ~ で追従モードをオンまたはオフにします。
- 追従モードがオフのときは、Right Ctrl + Right Ctrl + 0 で USB とオーディオを割り当てる PC を切り替えます。
- USB ストレージ機器がデータを読み書きしている間は切替を行わないでください。
ネットワーク共有
RJ45 ギガビットネットワークポートにより、接続したコンピューターでネットワーク接続を共有できます。
- RJ45 ポートをルーターまたはネットワークスイッチに接続します。
- Right Ctrl + Right Ctrl + F4 で、現在操作中の PC のネットワークアダプターをオンまたはオフにします。
- ネットワーク共有は、PC と KVM 切替器間の USB データ接続に依存します。
技術仕様
| 項目 | 仕様 |
|---|---|
| モデル | T722 |
| 製品タイプ | 2 台の PC に対応した混合インターフェースのデュアルモニター KVM 切替器 |
| コンピューター入力 | 2 PC |
| ディスプレイ出力 | 2 HDMI |
| 最大解像度 | 3840 × 2160 @ 60 Hz |
| 最大映像伝送速度 | 18 Gbps |
| PC 2 入力 | HDMI、DP、USB-B |
| PC 1 入力 | DP Alt Mode Type-C、フル機能 Type-C |
| 前面 USB ポート | USB 3.2 Gen 1、最大 5 Gbps |
| キーボード / マウスポート | 専用 USB-A ポート、USB 1.1 |
| オーディオ | 3.5 mm オーディオ / マイク端子、オーディオ出力対応 |
| ネットワーク | RJ45 ギガビットネットワーク、1000 Mbps |
| Control | Control ポート対応。有線コントローラーは別売 |
| Type-C 充電 | PC 1 のフル機能 Type-C 入力は 100 W PD 充電に対応 |
| 電源入力 | DC 20V / 7.5 A |
| 外形寸法 | 187.3 × 115 × 51.7 mm |
| 動作温度 | 0°C ~ 55°C / 32°F ~ 131°F |
| 保管温度 | -20°C ~ 65°C / -4°F ~ 149°F |
| 湿度 | 10% ~ 90%、結露なきこと |
| ESD 保護 | 人体モデル:±8 kV 空中放電、±4 kV 接触放電 |
| 対応 OS | Unix、Windows、Debian、Ubuntu、Fedora、Mac OS X、Raspberry Pi 用 Raspbian、Raspberry Pi 用 Ubuntu、およびその他の Linux ベースシステム |
トラブルシューティングガイド
ディスプレイに信号が表示されない
- 各ディスプレイが KVM 切替器の HDMI 出力ポートに接続されていることを確認します。
- ソースコンピューターが PC 1 または PC 2 の表示に従って正しい入力ポートに接続されていることを確認します。
- ディスプレイ側の入力ソースが HDMI に設定されていることを確認します。
- 画面がちらつく、黒くなる、または安定しない場合は、短いケーブルまたは高品質な HDMI / DP / Type-C ケーブルを使用してください。
- 出力解像度が 3840 × 2160 @ 60 Hz を超えていないことを確認します。
キーボードまたはマウスが反応しない
- キーボードとマウスを、背面のキーボード・マウス専用 USB-A ポートに接続します。
- 選択中の PC の USB データ接続が正しく接続されていることを確認します。
- Right Ctrl + Right Ctrl + F2 を押して、透過モードとエミュレーションモードを切り替えます。
- 必要に応じて、キーボードとマウスを再接続し、KVM 切替器を再起動します。
USB 周辺機器の問題
- ストレージ機器、カメラ、その他の USB 周辺機器は、キーボード・マウス専用ポートではなく USB 3.2 Gen 1 ポートに接続します。
- 対応する PC の USB データ接続が確立されていることを確認します。
- USB ストレージ機器がデータ転送中の場合は切替を行わないでください。
- 消費電力の大きい USB 機器は、コンピューターに直接接続するか、セルフパワー式 USB ハブを使用してください。
オーディオの問題
- 対象 PC の USB データ接続が接続されていることを確認します。
- オーディオ機器を 3.5 mm オーディオ / マイク端子に接続します。
- コンピューターのサウンド設定で、対応する USB オーディオ機器を選択します。
- オーディオが意図した PC に追従しない場合は、Right Ctrl + Right Ctrl + ~ で追従モードを確認するか、追従モードがオフの状態で Right Ctrl + Right Ctrl + 0 を使用して USB とオーディオの割り当てを切り替えます。
ネットワークの問題
- RJ45 ポートをルーターまたはネットワークスイッチに接続します。
- PC の USB データ接続が正しく接続されていることを確認します。
- Right Ctrl + Right Ctrl + F4 で、現在操作中の PC のネットワークアダプターをオンまたはオフにします。
- コンピューターが Wi-Fi よりも KVM の有線ネットワークを優先する場合は、OS のネットワーク設定で USB ネットワークアダプターを無効にするか、ホットキーでオフにします。
サポート
テクニカルサポートまたはアフターサービスに連絡する際は、モデル番号、接続図、コンピューターの OS、ディスプレイのモデル、ケーブルの種類、問題の詳細を用意してください。
- テクニカルサポートメール:support@tesmert.com
- アフターサービスメール:support@tesmert.com
- ウェブサイト:www.tesmert.com
제품 개요
T722 는 2 대의 PC 를 위한 혼합 인터페이스 듀얼 모니터 KVM 스위치입니다. 두 대의 컴퓨터가 두 대의 HDMI 디스플레이, 하나의 키보드와 마우스 세트, USB 주변기기, 오디오 장치, 기가비트 네트워크 연결을 공유할 수 있습니다. 디스플레이별 독립 전환, 혼합 화면 표시, 전면 버튼 전환, 키보드 단축키, 마우스 휠 전환을 지원합니다.
주요 특징
- 2 대 PC 및 2 화면 출력: 2 대의 컴퓨터 입력과 2 개의 HDMI 디스플레이 출력을 지원합니다.
- 4K 60 Hz 해상도: 최대 3840 × 2160 @ 60 Hz 를 지원합니다.
- MST 기술: MST 기술을 지원하여 단일 USB Type-C 신호 소스만으로 듀얼 디스플레이 출력이 가능합니다.
- 혼합 입력 연결: PC 2 는 HDMI, DP, USB-B 를 사용하고, PC 1 은 DP Alt Mode Type-C 및 풀기능 Type-C 입력을 사용합니다.
- USB 3.2 Gen 1 확장: 전면에 USB-A 포트 2 개를 제공하며, 최대 5 Gbps 전송 속도를 지원합니다.
- 키보드 및 마우스 전용 포트: 후면에 USB 1.1 기반의 키보드 및 마우스 전용 USB-A 포트를 제공합니다.
- 키보드 및 마우스 모드: 키보드와 마우스 동작을 위한 투명 모드와 에뮬레이션 모드를 지원합니다.
- 가상 디스플레이 / Ghost 기능: 전환 시 창 재배치와 디스플레이 재인식을 줄입니다.
- 고급 공유 기능: 혼합 화면 모드, USB 포커스 팔로우, 오디오 포커스 팔로우, 기가비트 네트워크 공유, 오디오 출력, PC 1 100 W PD 충전을 지원합니다.
포장 내용물
| 구성품 | 수량 |
|---|---|
| T722 KVM 스위치 | 1 |
| DC 20V 전원 어댑터 | 1 |
| USB Type-C 케이블 | 2 |
| USB Type-A to B 케이블 | 1 |
| 사용자 설명서 | 1 |
하드웨어 개요
전면 패널
| 번호 | 이름 | 설명 |
|---|---|---|
| 1 | 3.5 mm 오디오 / 마이크 잭 | 헤드폰, 스피커 또는 마이크를 연결합니다. |
| 2 | USB 3.2 Gen 1 포트 | 저장 장치, 카메라 등 USB 주변기기를 연결합니다. 최대 5 Gbps, 충전 출력 7.5 W, 5 V / 1.5 A. |
| 3 | 입력 선택 상태 표시등 | 현재 입력 채널 상태를 표시합니다. |
| 4 | 모니터 A 입력 소스 선택 버튼 | 모니터 A 에 표시되는 영상 소스를 전환합니다. |
| 5 | 입력 소스 순환 전환 버튼 | 입력 소스를 순환 전환합니다. |
| 6 | 모니터 B 입력 소스 선택 버튼 | 모니터 B 에 표시되는 영상 소스를 전환합니다. |
| 7 | Ghost 기능 표시등 | 가상 디스플레이 / Ghost 기능 상태를 표시합니다. |
| 8 | Ghost 버튼 | 가상 디스플레이 / Ghost 기능을 켜거나 끕니다. |
| 9 | 전원 버튼 | 길게 눌러 KVM 스위치 전원을 켜거나 끕니다. |
| 10 | Control 포트 | 외부 유선 컨트롤러를 연결하여 제어합니다. 유선 컨트롤러는 별도 구매품입니다. |
후면 패널
| 번호 | 이름 | 기능 |
|---|---|---|
| 1 | DC 20V 전원 포트 | DC 20V / 7.5 A 전원 어댑터를 연결합니다. |
| 2 | RJ45 기가비트 네트워크 포트 | 라우터 또는 네트워크 스위치에 연결하여 기가비트 네트워크 공유를 사용합니다. |
| 3 | HDMI 출력 포트 | 최대 두 대의 HDMI 디스플레이를 연결합니다. |
| 4 | 키보드 및 마우스 전용 포트 | 키보드와 마우스를 연결합니다. USB 1.1. |
| 5 | USB-B 입력 포트 | PC 2 의 USB 데이터 채널을 연결합니다. |
| 6 | HDMI 입력 포트 | PC 2 의 HDMI 영상 입력을 연결합니다. |
| 7 | DP 입력 포트 | PC 2 의 DP 영상 입력을 연결합니다. |
| 8 | DP Alt Mode 입력 포트 | PC 1 의 Type-C 영상 입력을 연결합니다. |
| 9 | 풀기능 Type-C 입력 | PC 1 의 영상 및 USB 데이터를 연결하며, 100 W PD 충전을 지원합니다. |
빠른 시작 가이드
1 단계: 물리적 연결
기본 연결
- 후면 패널의 두 HDMI 출력 포트를 두 디스플레이의 HDMI 입력에 연결합니다.
- 키보드와 마우스를 후면의 키보드 및 마우스 전용 USB-A 포트에 연결합니다.
- 후면 패널의 PC 2 표시에 따라 PC 2 를 HDMI 입력, DP 입력, USB-B 입력에 연결합니다.
- 후면 패널의 PC 1 표시에 따라 PC 1 을 DP Alt Mode Type-C 입력과 풀기능 Type-C 입력에 연결합니다.
참고: Windows OS:
MST 모드: USB Type-C 케이블 1 개를 사용하여 컴퓨터를 PC 1 의 "MST+USB" 라벨 입력 포트에 연결합니다.
SST 모드: USB Type-C 케이블 2 개를 사용하여 컴퓨터를 PC 1 의 "MST+USB" 및 "DP Alt" 라벨 입력 포트에 동시에 연결합니다.
macOS:
SST 모드만 지원됩니다. USB-C 케이블 2 개를 사용하여 컴퓨터를 PC 1 의 "MST+USB" 및 "DP Alt" 라벨 입력 포트에 동시에 연결합니다. - DC 20V 전원 어댑터를 KVM 스위치에 연결합니다.
선택 연결
- USB 주변기기 공유가 필요한 경우 전면 USB 3.2 Gen 1 포트에 USB 주변기기를 연결합니다.
- 오디오가 필요한 경우 헤드폰, 스피커 또는 마이크를 전면 3.5 mm 오디오 / 마이크 잭에 연결합니다.
- 네트워크 공유가 필요한 경우 RJ45 포트를 라우터 또는 네트워크 스위치에 연결합니다.
- 유선 컨트롤러 조작이 필요한 경우 선택 사항인 유선 컨트롤러를 Control 포트에 연결합니다. 유선 컨트롤러는 별도 구매품입니다.
2 단계: 전원 켜기 순서
- 디스플레이 전원을 켭니다.
- T722 전원을 켭니다.
- PC 1 과 PC 2 전원을 켭니다.
- 디스플레이와 USB 장치가 컴퓨터에서 인식될 때까지 기다립니다.
- 전면 표시등으로 현재 입력 상태를 확인합니다.
3 단계: 초기 설정
- 전면 모니터 A 및 모니터 B 버튼을 사용하여 각 디스플레이가 PC 1 과 PC 2 사이에서 전환되는지 확인합니다.
- 전환 후 바탕화면 배열이나 해상도가 변경되는 경우 전면 Ghost 버튼 또는 Right Ctrl + Right Ctrl + F5 로 가상 디스플레이 / Ghost 기능을 활성화합니다.
기본 조작
| 기능 | 조작 | 피드백 |
|---|---|---|
| 모니터 A 전환 | 전면 A 버튼을 누릅니다. | 모니터 A 가 다음 사용 가능한 PC 소스로 전환됩니다. |
| 모니터 B 전환 | 전면 B 버튼을 누릅니다. | 모니터 B 가 다음 사용 가능한 PC 소스로 전환됩니다. |
| 입력 소스 순환 전환 | 전면 순환 버튼을 누릅니다. | 입력 소스가 순환 전환됩니다. |
| 키보드 단축키 전환 | 기본 트리거 키를 두 번 누른 다음 1 초 이내에 명령 키를 누릅니다. | 해당 전환 또는 기능 명령이 실행됩니다. |
| 마우스 휠 전환 | 마우스 휠 전환을 활성화한 후 지정된 마우스 휠 동작을 사용합니다. | 설정에 따라 KVM 입력이 전환됩니다. |
| 유선 컨트롤러 | 선택 사항인 유선 컨트롤러를 Control 포트에 연결하고 조작합니다. | 유선 컨트롤러에서 KVM 을 제어할 수 있습니다. 유선 컨트롤러는 별도 구매품입니다. |
기본 단축키
기본 규칙: Right Ctrl + Right Ctrl 을 누른 후 1 초 이내에 명령 키를 누릅니다.
| 단축키 | 기능 |
|---|---|
| Right Ctrl + Right Ctrl + F1 + 새 트리거 키 | 핫키 트리거 키를 사용자 지정합니다. |
| Right Ctrl + Right Ctrl + F2 | 키보드 및 마우스 모드를 투명 모드와 에뮬레이션 모드 사이에서 전환합니다. |
| Right Ctrl + Right Ctrl + F4 | 현재 키보드와 마우스로 제어 중인 PC 의 네트워크 어댑터를 켜거나 끕니다. |
| Right Ctrl + Right Ctrl + F5 | 가상 디스플레이 / Ghost 기능을 켜거나 끕니다. |
| Right Ctrl + Right Ctrl + F6 | 마우스 가운데 버튼 / 휠 전환을 켜거나 끕니다. |
| Right Ctrl + Right Ctrl + F11 | 부저 음량 단계를 조정합니다. |
| Right Ctrl + Right Ctrl + PgUp | 이전 입력 포트로 전환합니다. |
| Right Ctrl + Right Ctrl + PgDn | 다음 입력 포트로 전환합니다. |
| Right Ctrl + Right Ctrl + 1 / 2 | PC 1 또는 PC 2 로 전환합니다. |
| Right Ctrl + Right Ctrl + ← | 모니터 A 에 표시되는 화면을 전환합니다. |
| Right Ctrl + Right Ctrl + → | 모니터 B 에 표시되는 화면을 전환합니다. |
| Right Alt + Right Alt | 혼합 화면 모드에서 키보드와 마우스가 제어하는 PC 를 전환합니다. |
| Right Ctrl + Right Ctrl + ~ | 팔로우 모드를 켜거나 끕니다. |
| Right Ctrl + Right Ctrl + 0 | 팔로우 모드가 꺼져 있을 때 오디오와 USB 가 할당될 PC 를 전환합니다. |
고급 기능
키보드 및 마우스 모드
T722 는 투명 모드와 에뮬레이션 모드를 지원합니다.
- 투명 모드는 키보드와 마우스 신호를 그대로 전달하여 특수 기능이 있는 키보드와 마우스를 더 잘 지원합니다.
- 에뮬레이션 모드는 키보드와 마우스의 연결 상태를 유지하여 PC 간 전환을 더 부드럽게 합니다.
Right Ctrl + Right Ctrl + F2 로 투명 모드와 에뮬레이션 모드를 전환합니다.
가상 디스플레이 / Ghost 기능
가상 디스플레이 / Ghost 기능은 전환 또는 혼합 화면 표시 중 디스플레이 인식 정보를 유지하는 데 도움이 됩니다. 이를 통해 창 재배치, 해상도 변경, 디스플레이 재인식을 줄일 수 있습니다.
- 전면 Ghost 버튼을 눌러 기능을 켜거나 끕니다.
- Right Ctrl + Right Ctrl + F5 로 기능을 켜거나 끕니다.
- Ghost 표시등이 현재 기능 상태를 표시합니다.
혼합 화면 모드
혼합 화면 모드에서는 모니터 A 와 모니터 B 에 서로 다른 PC 의 화면을 동시에 표시할 수 있습니다. 한 디스플레이만 전환해도 키보드와 마우스 제어 대상은 자동으로 전환되지 않습니다.
- 전면 A 또는 B 버튼으로 해당 디스플레이를 전환합니다.
- Right Ctrl + Right Ctrl + ← 로 모니터 A 를 전환합니다.
- Right Ctrl + Right Ctrl + → 로 모니터 B 를 전환합니다.
- Right Alt + Right Alt 로 혼합 화면 모드에서 키보드와 마우스가 제어하는 PC 를 전환합니다.
USB 및 오디오 포커스 팔로우
팔로우 모드가 켜져 있으면 USB 장치와 오디오가 현재 제어 중인 PC 를 따라갑니다.
- Right Ctrl + Right Ctrl + ~ 로 팔로우 모드를 켜거나 끕니다.
- 팔로우 모드가 꺼져 있을 때는 Right Ctrl + Right Ctrl + 0 으로 USB 와 오디오가 할당될 PC 를 전환합니다.
- USB 저장 장치가 데이터를 읽거나 쓰는 동안에는 전환하지 마십시오.
네트워크 공유
RJ45 기가비트 네트워크 포트를 통해 연결된 컴퓨터가 하나의 네트워크 연결을 공유할 수 있습니다.
- RJ45 포트를 라우터 또는 네트워크 스위치에 연결합니다.
- Right Ctrl + Right Ctrl + F4 로 현재 제어 중인 PC 의 네트워크 어댑터를 켜거나 끕니다.
- 네트워크 공유는 PC 와 KVM 스위치 사이의 USB 데이터 연결에 의존합니다.
기술 사양
| 항목 | 사양 |
|---|---|
| 모델 | T722 |
| 제품 유형 | 2 대의 PC 를 위한 혼합 인터페이스 듀얼 모니터 KVM 스위치 |
| 컴퓨터 입력 | 2 PC |
| 디스플레이 출력 | 2 HDMI |
| 최대 해상도 | 3840 × 2160 @ 60 Hz |
| 최대 영상 전송 속도 | 18 Gbps |
| PC 2 입력 | HDMI, DP, USB-B |
| PC 1 입력 | DP Alt Mode Type-C, 풀기능 Type-C |
| 전면 USB 포트 | USB 3.2 Gen 1, 최대 5 Gbps |
| 키보드 / 마우스 포트 | 전용 USB-A 포트, USB 1.1 |
| 오디오 | 3.5 mm 오디오 / 마이크 잭, 오디오 출력 지원 |
| 네트워크 | RJ45 기가비트 네트워크, 1000 Mbps |
| Control | Control 포트 지원, 유선 컨트롤러는 별도 구매품 |
| Type-C 충전 | PC 1 풀기능 Type-C 입력은 100 W PD 충전을 지원 |
| 전원 입력 | DC 20V / 7.5 A |
| 크기 | 187.3 × 115 × 51.7 mm |
| 동작 온도 | 0°C ~ 55°C / 32°F ~ 131°F |
| 보관 온도 | -20°C ~ 65°C / -4°F ~ 149°F |
| 습도 | 10% ~ 90%, 비응축 |
| ESD 보호 | 인체 모델: ±8 kV 공기 방전, ±4 kV 접촉 방전 |
| 운영 체제 호환성 | Unix, Windows, Debian, Ubuntu, Fedora, Mac OS X, Raspberry Pi 용 Raspbian, Raspberry Pi 용 Ubuntu 및 기타 Linux 기반 시스템 |
문제 해결 가이드
디스플레이에 신호가 없음
- 각 디스플레이가 KVM 스위치의 HDMI 출력 포트에 연결되어 있는지 확인합니다.
- 소스 컴퓨터가 PC 1 또는 PC 2 표시를 따라 올바른 입력 포트에 연결되어 있는지 확인합니다.
- 디스플레이 입력 소스가 HDMI 로 설정되어 있는지 확인합니다.
- 화면이 깜박이거나 검게 변하거나 안정적으로 유지되지 않는 경우 더 짧거나 품질이 좋은 HDMI / DP / Type-C 케이블을 사용합니다.
- 출력 해상도가 3840 × 2160 @ 60 Hz 를 초과하지 않는지 확인합니다.
키보드 또는 마우스가 반응하지 않음
- 키보드와 마우스를 후면의 키보드 및 마우스 전용 USB-A 포트에 연결합니다.
- 선택한 PC 의 USB 데이터 연결이 올바르게 연결되어 있는지 확인합니다.
- Right Ctrl + Right Ctrl + F2 를 눌러 투명 모드와 에뮬레이션 모드를 전환합니다.
- 필요한 경우 키보드와 마우스를 다시 연결하고 KVM 스위치를 재시작합니다.
USB 주변기기 문제
- 저장 장치, 카메라 및 기타 USB 주변기기는 키보드 및 마우스 전용 포트가 아니라 USB 3.2 Gen 1 포트에 연결합니다.
- 해당 PC 의 USB 데이터 연결이 설정되어 있는지 확인합니다.
- USB 저장 장치가 데이터를 전송하는 동안에는 전환하지 마십시오.
- 전력 소모가 큰 USB 장치는 컴퓨터에 직접 연결하거나 별도 전원이 있는 USB 허브를 사용하십시오.
오디오 문제
- 해당 PC 의 USB 데이터 연결이 연결되어 있는지 확인합니다.
- 오디오 장치를 3.5 mm 오디오 / 마이크 잭에 연결합니다.
- 컴퓨터 사운드 설정에서 해당 USB 오디오 장치를 선택합니다.
- 오디오가 원하는 PC 를 따라가지 않는 경우 Right Ctrl + Right Ctrl + ~ 로 팔로우 모드를 확인하거나, 팔로우 모드가 꺼져 있을 때 Right Ctrl + Right Ctrl + 0 으로 USB 및 오디오 할당을 전환합니다.
네트워크 문제
- RJ45 포트를 라우터 또는 네트워크 스위치에 연결합니다.
- PC 의 USB 데이터 연결이 올바르게 연결되어 있는지 확인합니다.
- Right Ctrl + Right Ctrl + F4 로 현재 제어 중인 PC 의 네트워크 어댑터를 켜거나 끕니다.
- 컴퓨터가 Wi-Fi 보다 KVM 유선 네트워크를 우선하는 경우 운영 체제의 네트워크 설정에서 USB 네트워크 어댑터를 비활성화하거나 핫키로 끕니다.
지원
기술 지원 또는 애프터서비스를 요청할 때는 모델 번호, 연결도, 컴퓨터 운영 체제, 디스플레이 모델, 케이블 종류, 문제 설명을 준비하십시오.
- 기술 지원 이메일: support@tesmert.com
- 애프터서비스 이메일: support@tesmert.com
- 웹사이트: www.tesmert.com
产品概述
T722 是一款混合接口双屏 2 PC KVM 切换器。它可让两台电脑共享两台 HDMI 显示器、一套键盘鼠标、USB 外设、音频设备以及千兆网络连接。产品支持显示器独立切换、混屏显示、前面板按键切换、键盘热键切换和鼠标滚轮切换。
主要特性
- 双 PC 双屏输出:支持 2 台电脑输入和 2 路 HDMI 显示输出。
- 4K 60 Hz 分辨率:支持最高 3840 × 2160 @ 60 Hz。
- MST 技术:支持 MST 技术,仅通过单一 USB Type-C 信号源即可实现双屏显示。
- 混合输入连接:PC 2 使用 HDMI、DP 和 USB-B;PC 1 使用 DP Alt Mode Type-C 和全功能 Type-C 输入。
- USB 3.2 Gen 1 扩展:前面板提供 2 个 USB-A 接口,传输速率最高 5 Gbps。
- 键盘鼠标专用接口:后面板提供键盘鼠标专用 USB-A 接口,规格为 USB 1.1。
- 键盘鼠标模式:支持键盘鼠标透传模式和模拟模式。
- 虚拟显示器 / Ghost 功能:可减少切换时的窗口重排和显示器重新识别。
- 高级共享功能:支持混屏模式、USB 焦点跟随、音频焦点跟随、千兆网络共享、音频输出以及 PC 1 100 W PD 充电。
包装内容
| 物品 | 数量 |
|---|---|
| T722 KVM 切换器 | 1 |
| DC 20V 电源适配器 | 1 |
| USB Type-C 线缆 | 2 |
| USB Type-A 转 Type-B 线缆 | 1 |
| 说明书 | 1 |
硬件概述
前面板
| 编号 | 名称 | 说明 |
|---|---|---|
| 1 | 3.5 mm 音频 / 麦克风接口 | 连接耳机、音响或麦克风。 |
| 2 | USB 3.2 Gen 1 接口 | 连接 U 盘、摄像头等 USB 外设;最高 5 Gbps;充电输出 7.5 W,5 V / 1.5 A。 |
| 3 | 输入选择状态指示灯 | 显示当前输入通道状态。 |
| 4 | 显示器 A 输入源选择按键 | 切换显示器 A 所显示的视频来源。 |
| 5 | 输入源循环切换按键 | 循环切换输入源。 |
| 6 | 显示器 B 输入源选择按键 | 切换显示器 B 所显示的视频来源。 |
| 7 | Ghost 功能开关指示灯 | 显示虚拟显示器 / Ghost 功能状态。 |
| 8 | Ghost 按键 | 开启或关闭虚拟显示器 / Ghost 功能。 |
| 9 | 电源开关 | 长按开启或关闭 KVM 切换器电源。 |
| 10 | Control 控制接口 | 连接外接有线控制器进行控制。有线控制器需单独购买。 |
后面板
| 编号 | 名称 | 功能 |
|---|---|---|
| 1 | DC 20V 电源接口 | 连接 DC 20V / 7.5 A 电源适配器。 |
| 2 | RJ45 千兆网络接口 | 连接路由器或交换机,实现千兆网络共享。 |
| 3 | HDMI 输出接口 | 连接最多两台 HDMI 显示器。 |
| 4 | 键盘鼠标专用接口 | 连接键盘和鼠标,规格为 USB 1.1。 |
| 5 | USB-B 输入接口 | 连接 PC 2 的 USB 数据通道。 |
| 6 | HDMI 输入接口 | 连接 PC 2 的 HDMI 视频输入。 |
| 7 | DP 输入接口 | 连接 PC 2 的 DP 视频输入。 |
| 8 | DP Alt Mode 输入接口 | 连接 PC 1 的 Type-C 视频输入。 |
| 9 | 全功能 Type-C 输入接口 | 连接 PC 1 的视频和 USB 数据,并支持 100 W PD 充电。 |
快速入门指南
第 1 步:物理连接
基本连接
- 将后面板两个 HDMI 输出接口连接到两台显示器的 HDMI 输入接口。
- 将键盘和鼠标连接到后面板键盘鼠标专用 USB-A 接口。
- 按后面板 PC 2 标识,将 PC 2 连接到 HDMI 输入、DP 输入和 USB-B 输入接口。
- 按后面板 PC 1 标识,将 PC 1 连接到 DP Alt Mode Type-C 输入和全功能 Type-C 输入接口。
备注: Windows 操作系统:
MST 模式:使用 1 根 USB Type-C 线缆,将电脑连接至 PC 1 标注为 "MST+USB" 的输入端口。
SST 模式:使用 2 根 USB Type-C 线缆同时连接 PC 1 标注为 "MST+USB" 与 "DP Alt" 的输入端口。
macOS:
仅支持 SST 模式,需使用 2 根 USB-C 线缆将电脑同时连接至 PC 1 标注为 "MST+USB" 和 "DP Alt" 的输入端口。 - 将 DC 20V 电源适配器连接到 KVM 切换器。
可选连接
- 如需共享 USB 外设,请将 USB 外设连接到前面板 USB 3.2 Gen 1 接口。
- 如需使用音频,请将耳机、音响或麦克风连接到前面板 3.5 mm 音频 / 麦克风接口。
- 如需网络共享,请将 RJ45 接口连接到路由器或交换机。
- 如需使用有线控制器,请将选配有线控制器连接到 Control 控制接口。有线控制器需单独购买。
第 2 步:开机顺序
- 打开显示器电源。
- 打开 T722 电源。
- 打开 PC 1 和 PC 2 电源。
- 等待显示器和 USB 设备被电脑识别。
- 通过前面板指示灯确认当前输入状态。
第 3 步:初始配置
- 使用前面板显示器 A 和显示器 B 按键,确认每台显示器都可以在 PC 1 和 PC 2 之间切换。
- 如果切换后桌面布局或分辨率发生变化,请通过前面板 Ghost 按键或 Right Ctrl + Right Ctrl + F5 开启虚拟显示器 / Ghost 功能。
基本操作
| 功能 | 操作 | 反馈 |
|---|---|---|
| 切换显示器 A | 按前面板 A 按键。 | 显示器 A 切换到下一个可用 PC 输入源。 |
| 切换显示器 B | 按前面板 B 按键。 | 显示器 B 切换到下一个可用 PC 输入源。 |
| 循环切换输入源 | 按前面板循环切换按键。 | 输入源循环切换。 |
| 键盘热键切换 | 连续按两次默认触发键,并在 1 秒内按下命令键。 | 执行对应的切换或功能命令。 |
| 鼠标滚轮切换 | 开启鼠标滚轮切换后,执行对应的鼠标滚轮操作。 | KVM 按设置切换输入。 |
| 有线控制器 | 将选配有线控制器连接到 Control 控制接口后操作。 | 可通过有线控制器控制 KVM。有线控制器需单独购买。 |
基本快捷键
默认热键规则:按 Right Ctrl + Right Ctrl,然后在 1 秒内按下命令键。
| 快捷键 | 功能 |
|---|---|
| Right Ctrl + Right Ctrl + F1 + 新热键 | 自定义热键触发键。 |
| Right Ctrl + Right Ctrl + F2 | 在键盘鼠标透传模式和模拟模式之间切换。 |
| Right Ctrl + Right Ctrl + F4 | 开启或关闭当前键鼠控制 PC 的网卡。 |
| Right Ctrl + Right Ctrl + F5 | 开启或关闭虚拟显示器 / Ghost 功能。 |
| Right Ctrl + Right Ctrl + F6 | 开启或关闭鼠标中键 / 滚轮切换功能。 |
| Right Ctrl + Right Ctrl + F11 | 调节蜂鸣器音量挡位。 |
| Right Ctrl + Right Ctrl + PgUp | 切换到上一个输入端口。 |
| Right Ctrl + Right Ctrl + PgDn | 切换到下一个输入端口。 |
| Right Ctrl + Right Ctrl + 1 / 2 | 切换到 PC 1 或 PC 2。 |
| Right Ctrl + Right Ctrl + ← | 切换显示器 A 所显示的画面。 |
| Right Ctrl + Right Ctrl + → | 切换显示器 B 所显示的画面。 |
| Right Alt + Right Alt | 在混屏模式下切换键盘鼠标可控制的 PC。 |
| Right Ctrl + Right Ctrl + ~ | 开启或关闭跟随模式。 |
| Right Ctrl + Right Ctrl + 0 | 跟随模式关闭时,切换音频及 USB 所在的 PC。 |
高级功能
键盘鼠标模式
T722 支持透传模式和模拟模式。
- 透传模式会直接传输键盘和鼠标信号,以便更好支持特殊键盘鼠标功能。
- 模拟模式会保持键盘和鼠标的连接状态,使不同 PC 之间的切换更加平稳。
使用 Right Ctrl + Right Ctrl + F2 可在透传模式和模拟模式之间切换。
虚拟显示器 / Ghost 功能
虚拟显示器 / Ghost 功能用于在切换或混屏显示时保持显示器识别信息,可减少窗口重排、分辨率变化或显示器重新识别。
- 按前面板 Ghost 按键可开启或关闭该功能。
- 使用 Right Ctrl + Right Ctrl + F5 可开启或关闭该功能。
- Ghost 指示灯显示当前功能状态。
混屏模式
混屏模式允许显示器 A 和显示器 B 同时显示不同 PC 的画面。单独切换某一台显示器时,键盘鼠标控制权不会自动切换。
- 使用前面板 A 或 B 按键切换对应显示器。
- 使用 Right Ctrl + Right Ctrl + ← 切换显示器 A。
- 使用 Right Ctrl + Right Ctrl + → 切换显示器 B。
- 使用 Right Alt + Right Alt 可在混屏模式下切换键盘鼠标可控制的 PC。
USB 与音频焦点跟随
跟随模式开启时,USB 设备和音频会跟随当前键鼠控制的 PC。
- 使用 Right Ctrl + Right Ctrl + ~ 开启或关闭跟随模式。
- 跟随模式关闭时,使用 Right Ctrl + Right Ctrl + 0 切换 USB 和音频所在的 PC。
- USB 存储设备正在读写数据时,请勿切换。
网络共享
RJ45 千兆网络接口可让连接的电脑共享网络连接。
- 将 RJ45 接口连接到路由器或交换机。
- 使用 Right Ctrl + Right Ctrl + F4 开启或关闭当前键鼠控制 PC 的网卡。
- 网络共享依赖 PC 与 KVM 切换器之间的 USB 数据连接。
技术规格
| 项目 | 规格 |
|---|---|
| 型号 | T722 |
| 产品类型 | 混合接口双屏 2 PC KVM 切换器 |
| 电脑输入 | 2 PC |
| 显示输出 | 2 HDMI |
| 最高分辨率 | 3840 × 2160 @ 60 Hz |
| 最高视频传输速率 | 18 Gbps |
| PC 2 输入 | HDMI、DP、USB-B |
| PC 1 输入 | DP Alt Mode Type-C、全功能 Type-C |
| 前面板 USB 接口 | USB 3.2 Gen 1,最高 5 Gbps |
| 键盘 / 鼠标接口 | 专用 USB-A 接口,USB 1.1 |
| 音频 | 3.5 mm 音频 / 麦克风接口,支持音频输出 |
| 网络 | RJ45 千兆网络,1000 Mbps |
| Control | 支持 Control 控制接口;有线控制器需单独购买 |
| Type-C 充电 | PC 1 全功能 Type-C 输入支持 100 W PD 充电 |
| 电源输入 | DC 20V / 7.5 A |
| 产品尺寸 | 187.3 × 115 × 51.7 mm |
| 工作温度 | 0°C 至 55°C / 32°F 至 131°F |
| 存储温度 | -20°C 至 65°C / -4°F 至 149°F |
| 湿度 | 10% 至 90%,非冷凝 |
| ESD 保护 | 人体模型:±8 kV 空气放电,±4 kV 接触放电 |
| 操作系统兼容性 | Unix、Windows、Debian、Ubuntu、Fedora、Mac OS X、Raspberry Pi 用 Raspbian、Raspberry Pi 用 Ubuntu,以及其他基于 Linux 的系统 |
故障排除指南
显示器无信号
- 检查每台显示器是否连接到 KVM 切换器的 HDMI 输出接口。
- 检查信号源电脑是否按 PC 1 或 PC 2 标识连接到正确输入接口。
- 确认显示器输入源已设置为 HDMI。
- 如果画面闪烁、黑屏或无法稳定显示,请更换更短或质量更好的 HDMI / DP / Type-C 线缆。
- 确认输出分辨率不超过 3840 × 2160 @ 60 Hz。
键盘或鼠标无响应
- 将键盘和鼠标连接到后面板键盘鼠标专用 USB-A 接口。
- 确认当前选择 PC 的 USB 数据连接正确。
- 按 Right Ctrl + Right Ctrl + F2 在透传模式和模拟模式之间切换。
- 如有需要,重新插拔键盘鼠标并重启 KVM 切换器。
USB 外设异常
- U 盘、摄像头及其他 USB 外设应连接到 USB 3.2 Gen 1 接口,不要连接到键盘鼠标专用接口。
- 确认对应 PC 的 USB 数据连接已经建立。
- USB 存储设备正在传输数据时,请勿切换。
- 高功耗 USB 设备建议直连电脑,或使用带独立供电的 USB Hub。
音频异常
- 确认对应 PC 的 USB 数据连接已经接好。
- 将音频设备连接到 3.5 mm 音频 / 麦克风接口。
- 在电脑声音设置中选择对应的 USB 音频设备。
- 如果音频未跟随到目标 PC,请使用 Right Ctrl + Right Ctrl + ~ 检查跟随模式;跟随模式关闭时,可使用 Right Ctrl + Right Ctrl + 0 切换 USB 和音频所在 PC。
网络异常
- 将 RJ45 接口连接到路由器或交换机。
- 确认 PC 的 USB 数据连接正确。
- 使用 Right Ctrl + Right Ctrl + F4 开启或关闭当前键鼠控制 PC 的网卡。
- 如果电脑优先使用 KVM 有线网络而不是 Wi-Fi,可在操作系统网络设置中禁用 USB 网卡,或通过热键关闭。
支持
联系技术支持或售后服务时,请准备产品型号、连接示意、电脑操作系统、显示器型号、线缆类型以及问题描述。
- 技术支持邮箱:support@tesmert.com
- 售后邮箱:support@tesmert.com
- 官方网站:www.tesmert.com