


Model: T2410-USRB
4-Port DisplayPort 1.4 KVM Switch for 4 PCs 1 Monitor 4K@144Hz
*Need a different power plug? Contact us.
Pairs well with
Free US Shipping! Ships within 5-7 business days.
30-Day Hassle-Free Returns & Purchase Guarantee
1-Year Warranty
Secure Payment
4-Port DisplayPort 1.4 KVM Switch for 4 PCs 1 Monitor 4K@144Hz
If you have any questions, you are always welcome to contact us. We'll get back to you as soon as possible, within 24 hours on weekdays.
-
Free US Shipping · Fast Delivery
Delivery typically arrives in 5–7 business days.
Details are available in our Shipping Policy. -
30-Day Returns · Quality Guaranteed
Returns are accepted within 30 days for peace of mind.
See our Returns & Warranty Policy for details. -
Secure & Trusted Payments
All transactions are protected with industry-standard security.
-
Customer Support
Questions about your order? Feel free to Contact Us.
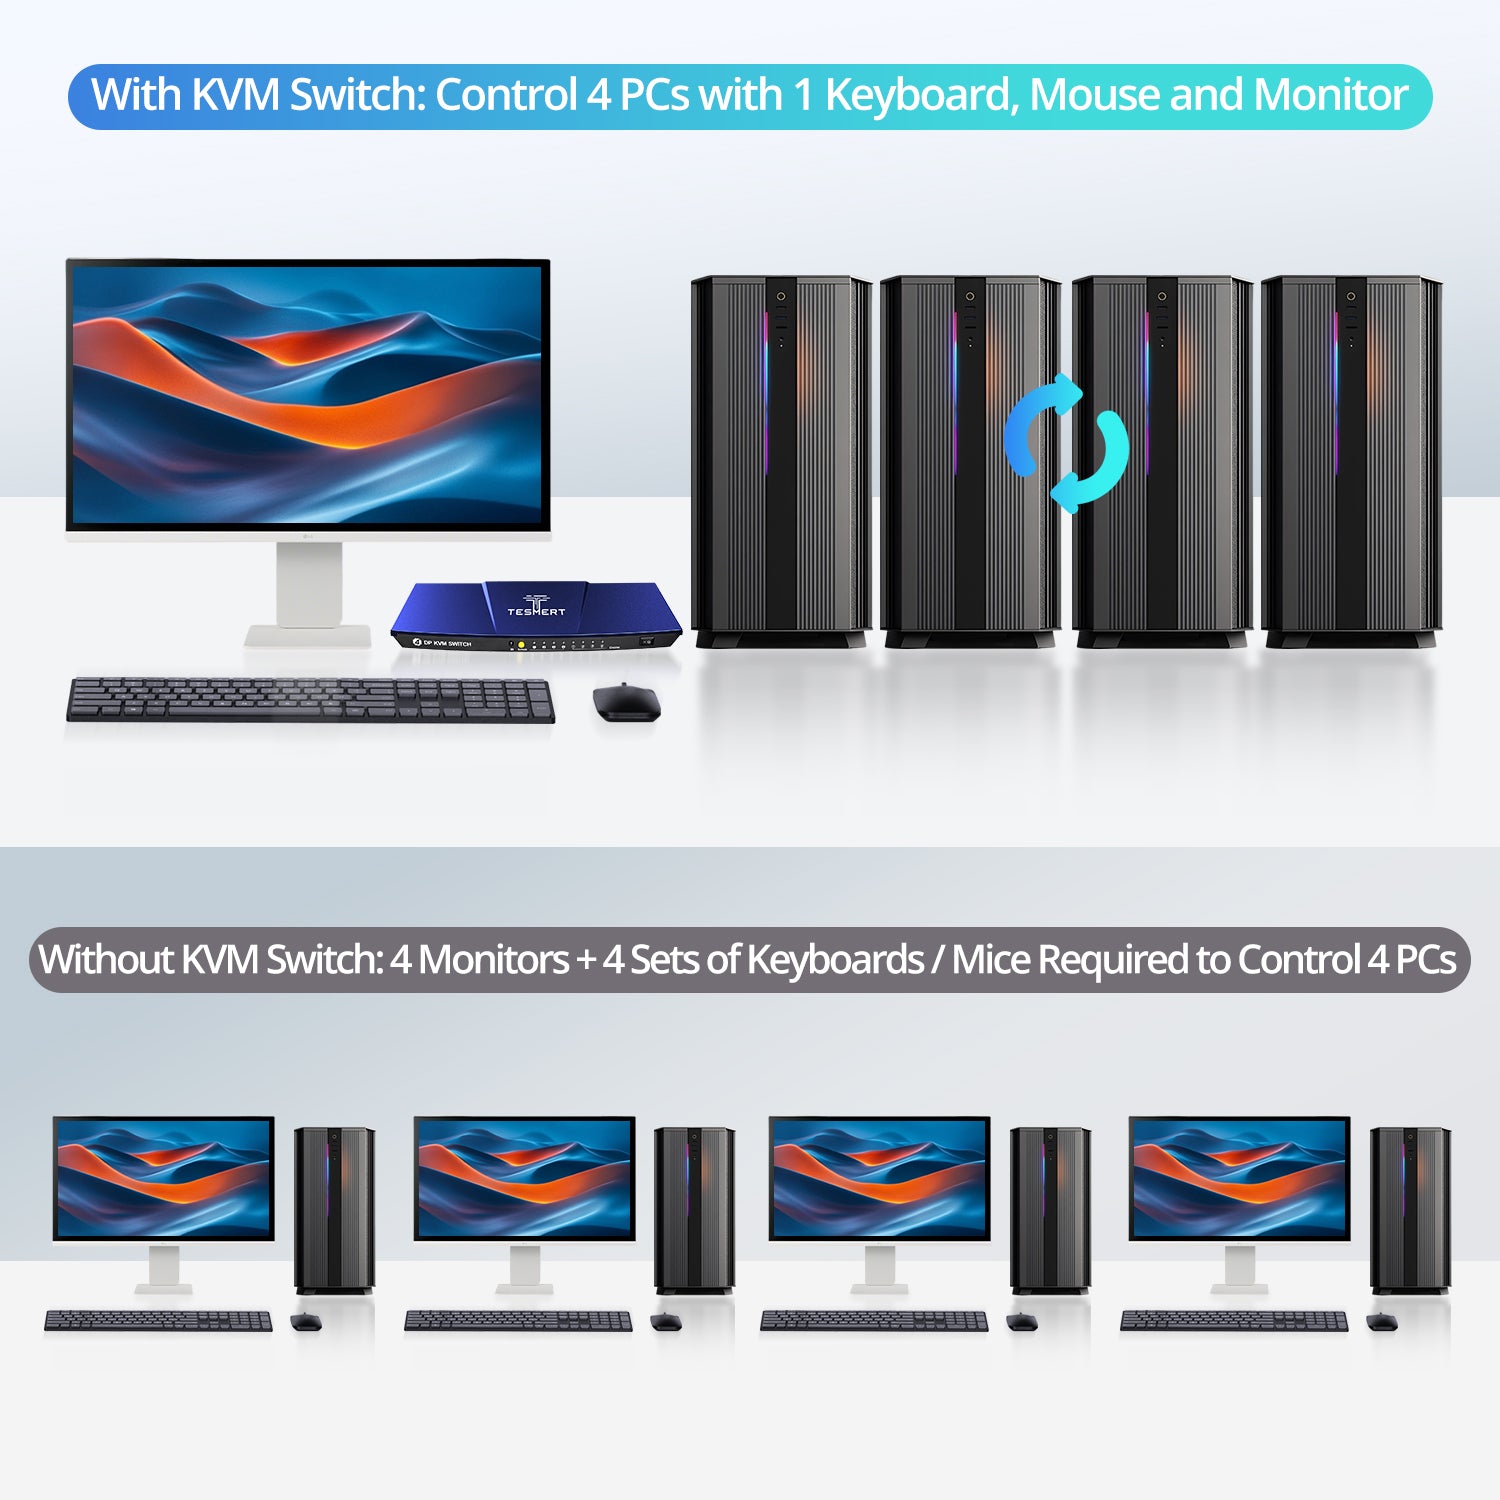
Overview
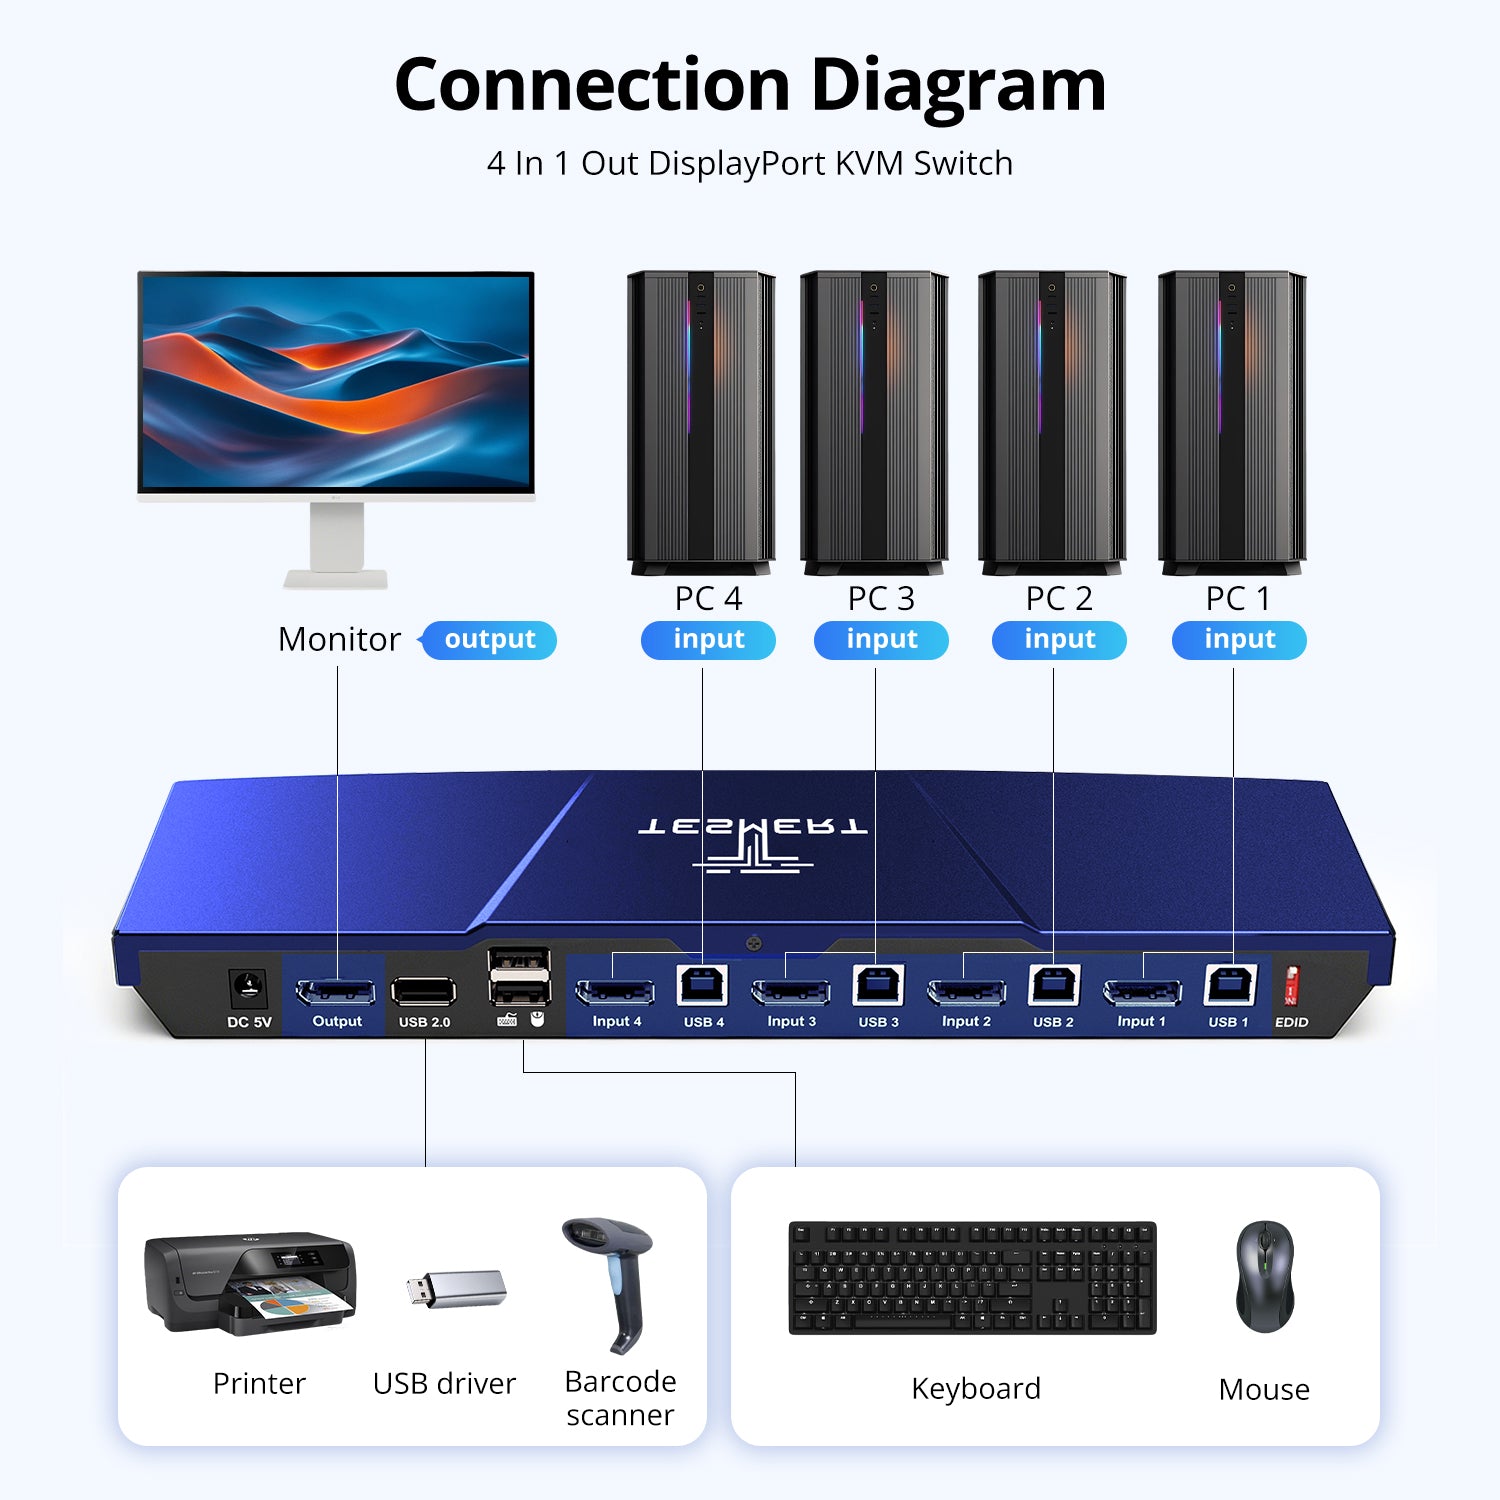
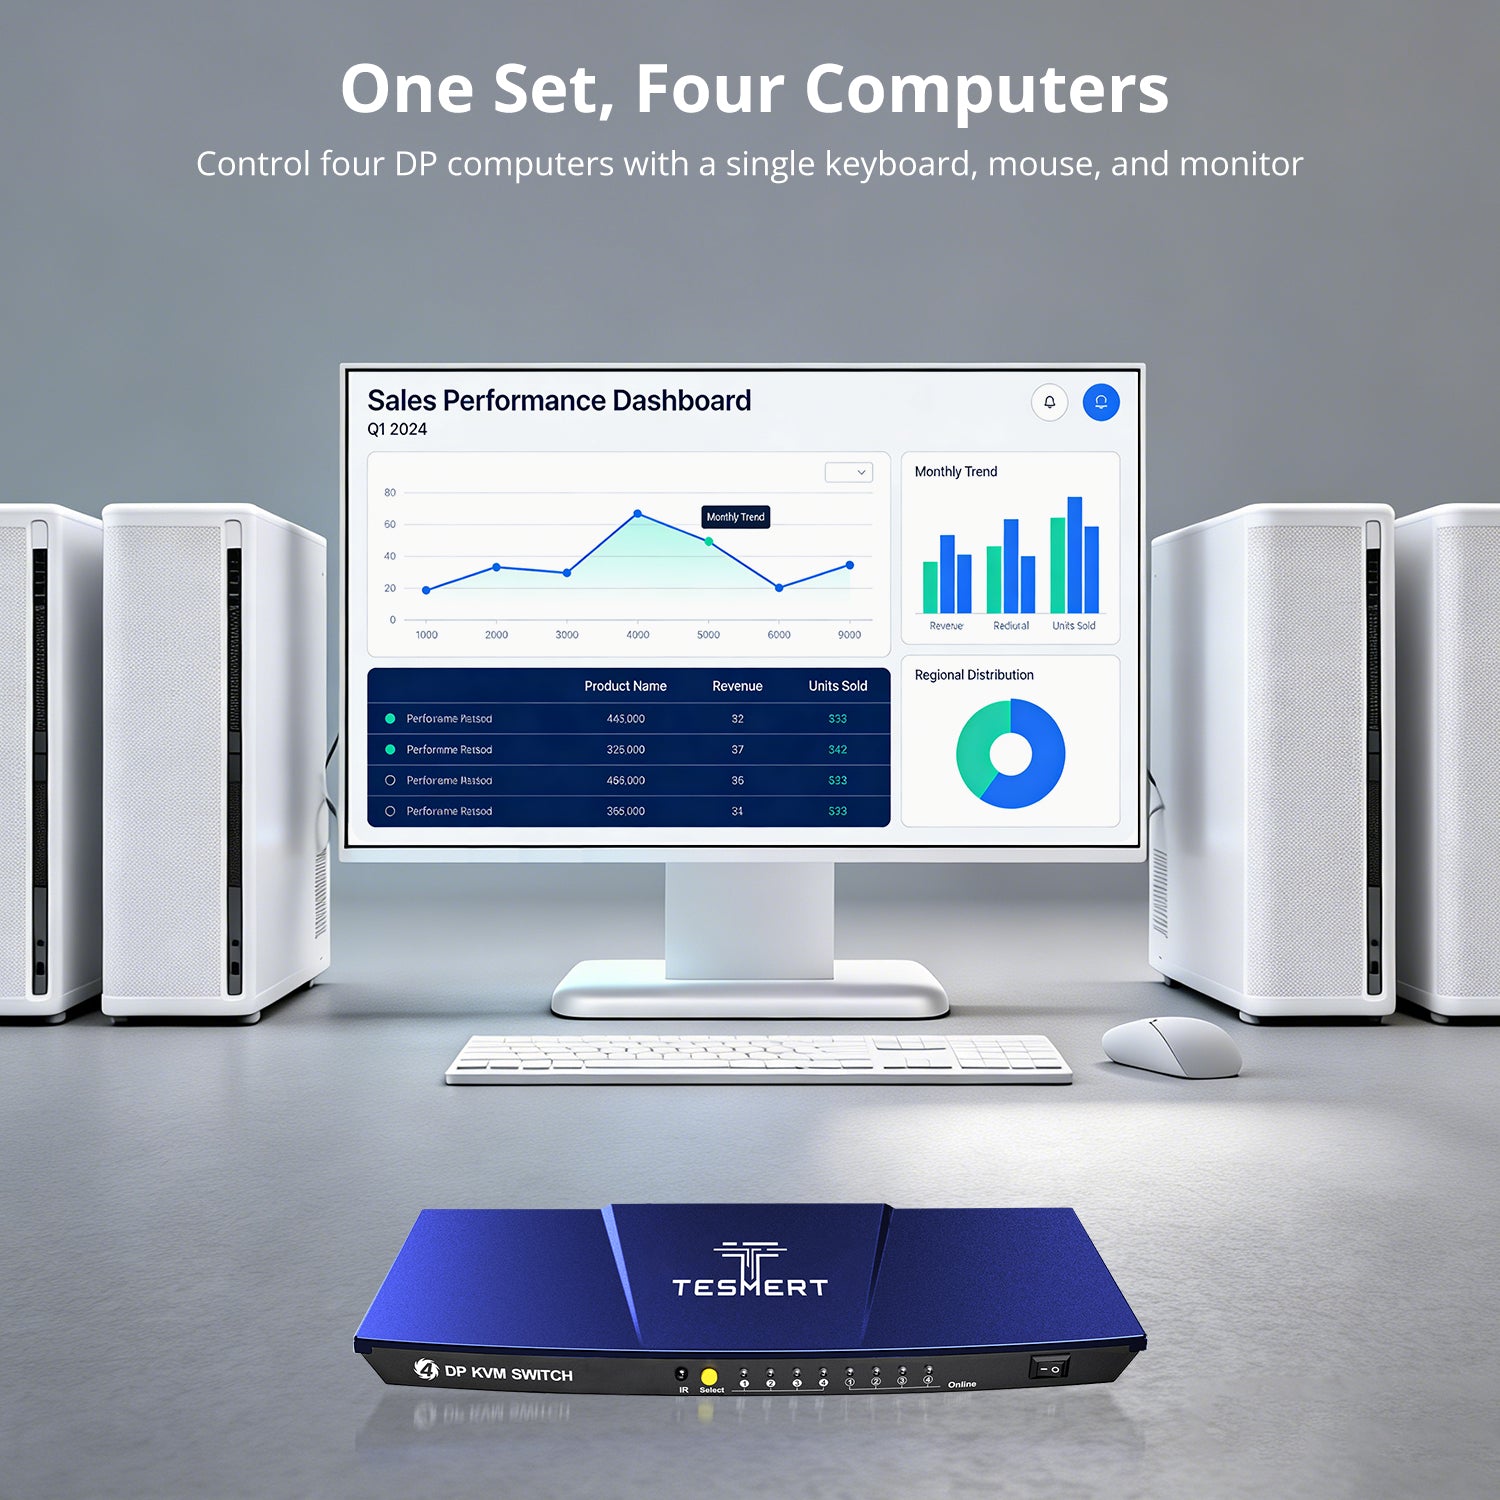
Designed for users who need high-performance switching between multiple computers, this 4-in-1-out DisplayPort KVM switch allows four computers to share one monitor, keyboard, mouse, and USB peripherals from a single workstation. Ideal for development environments, gaming setups, creative workflows, and professional workstations.
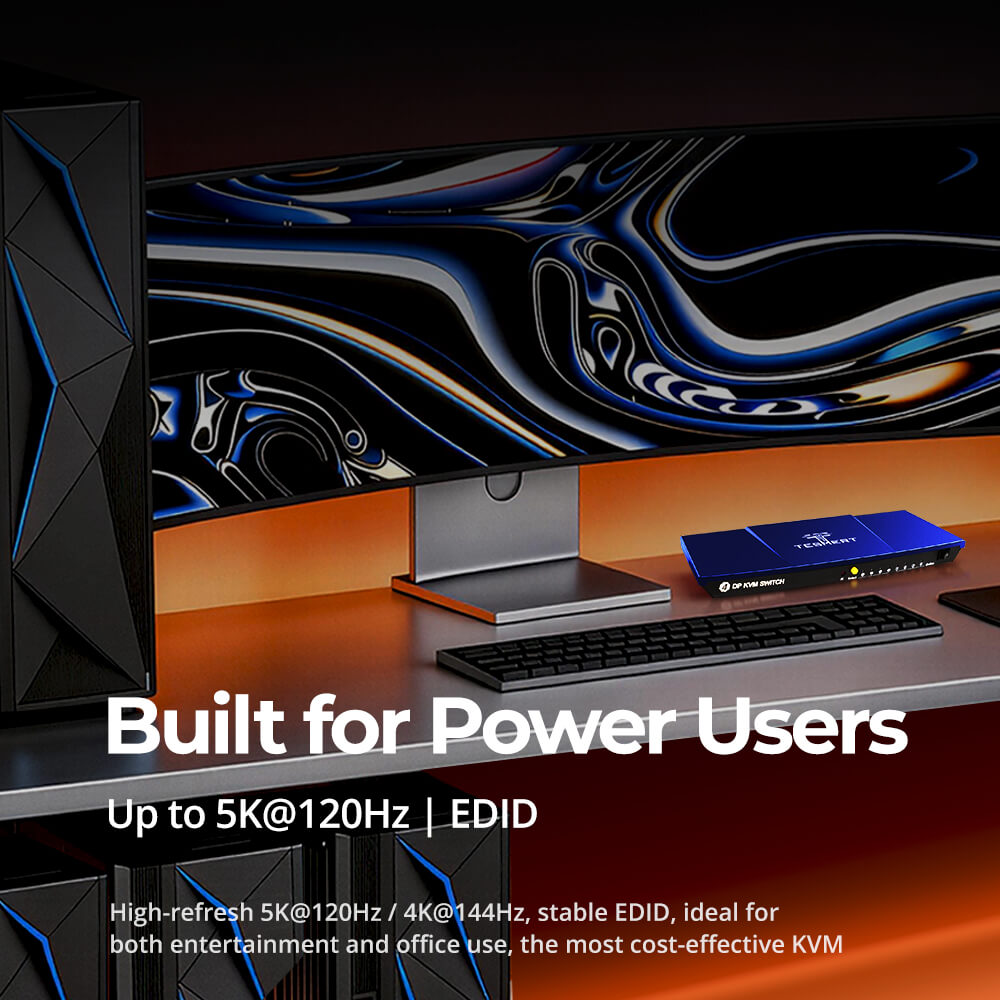
- Up to 4K@144Hz Display Performance
Take advantage of DisplayPort 1.4 bandwidth for high-refresh-rate monitors. Enjoy smoother motion, improved responsiveness, and sharper visuals for work and entertainment. - Share USB Peripherals
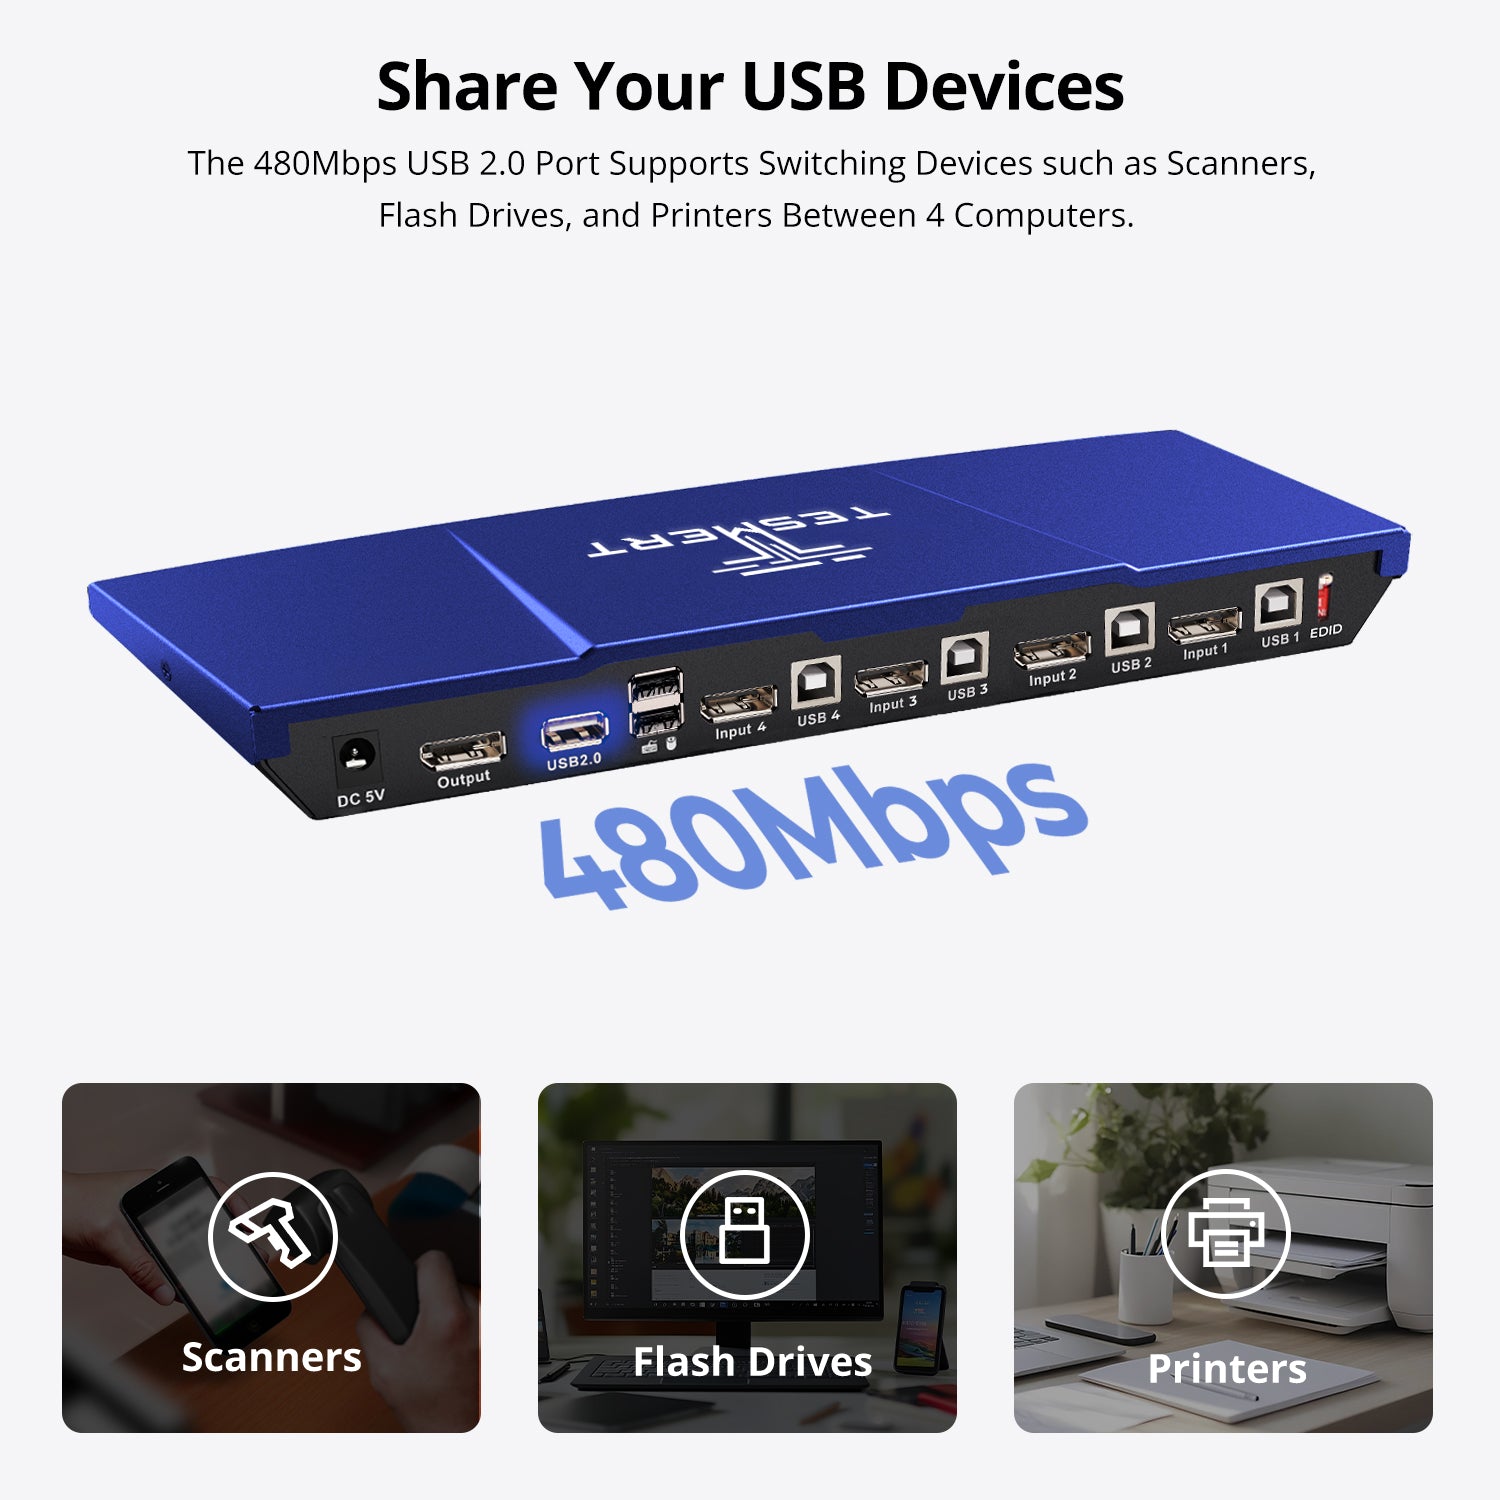
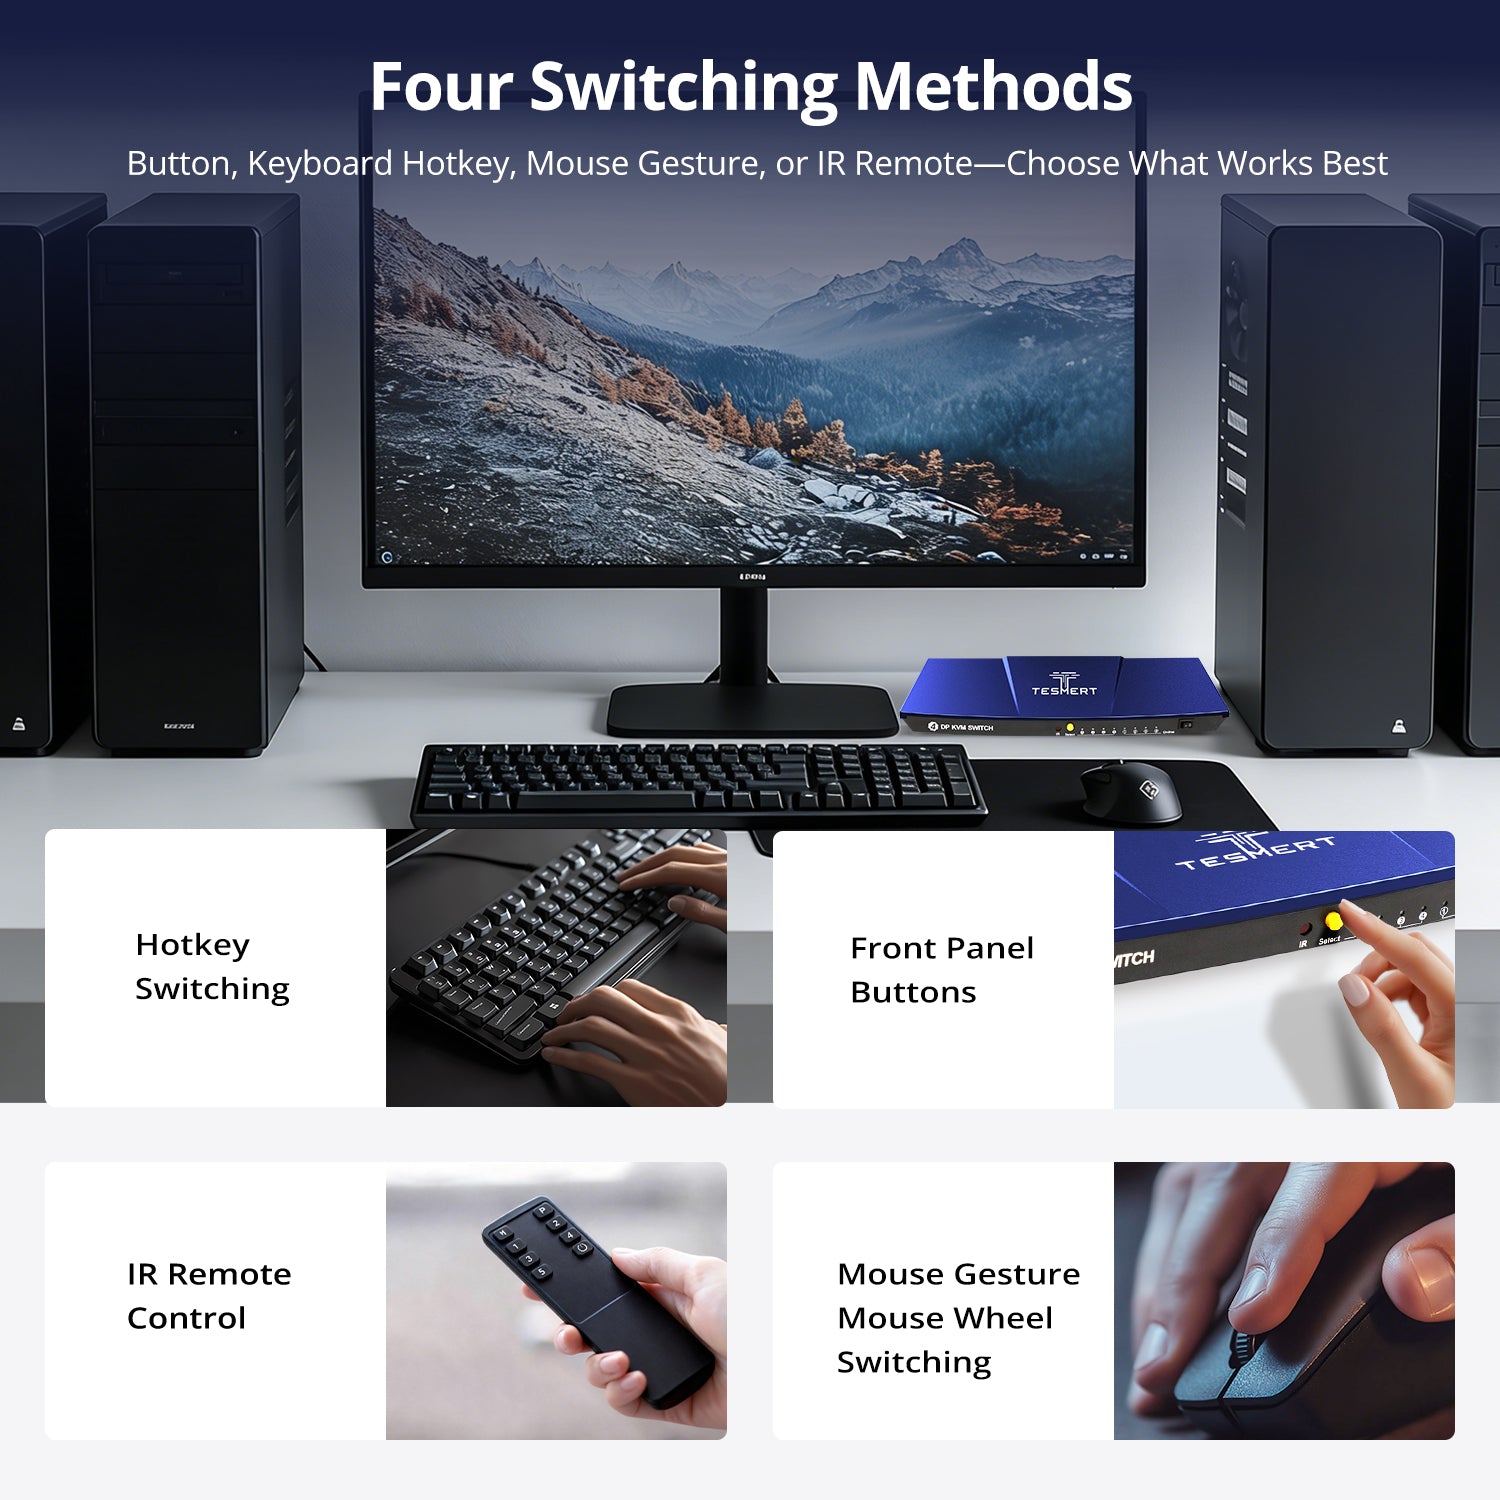
Connect and share essential USB devices such as flash drives, printers, barcode scanners, and other USB peripherals between four computers while reducing desk clutter. - 5 Ways to Switch
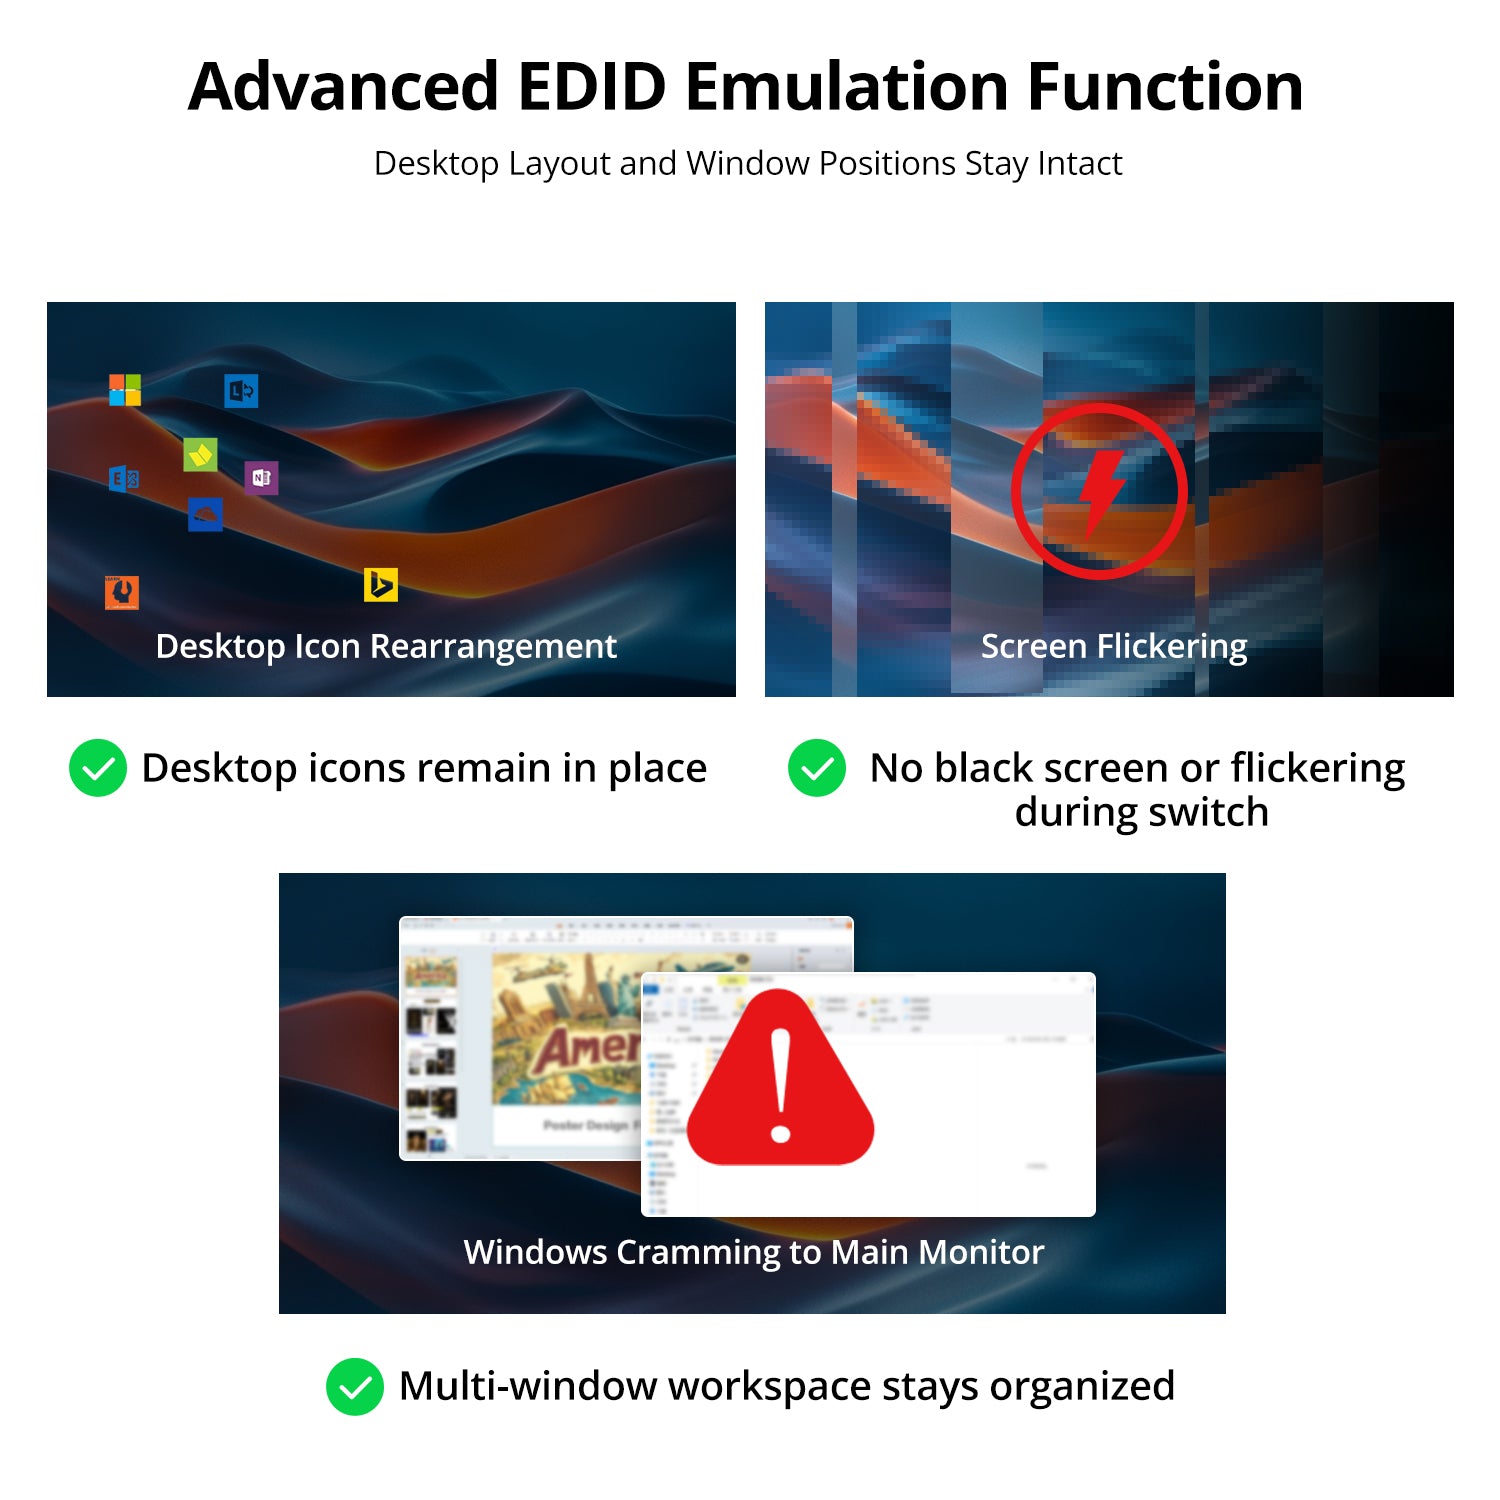
Switch computers using the front-panel button, keyboard hotkeys, mouse wheel gestures, IR remote control, or Auto Scan mode—no software installation required. - Flexible EDID Management
Built-in EDID emulation helps maintain display information and reduce monitor re-detection during switching. A dedicated hardware switch allows EDID to be enabled or disabled based on your setup requirements. - Enhanced Keyboard & Mouse Compatibility
Keyboard and mouse pass-through technology improves compatibility with a wider range of wired, wireless, gaming, and specialty input devices for a more seamless switching experience.
Technical Details
Specifications
Connections
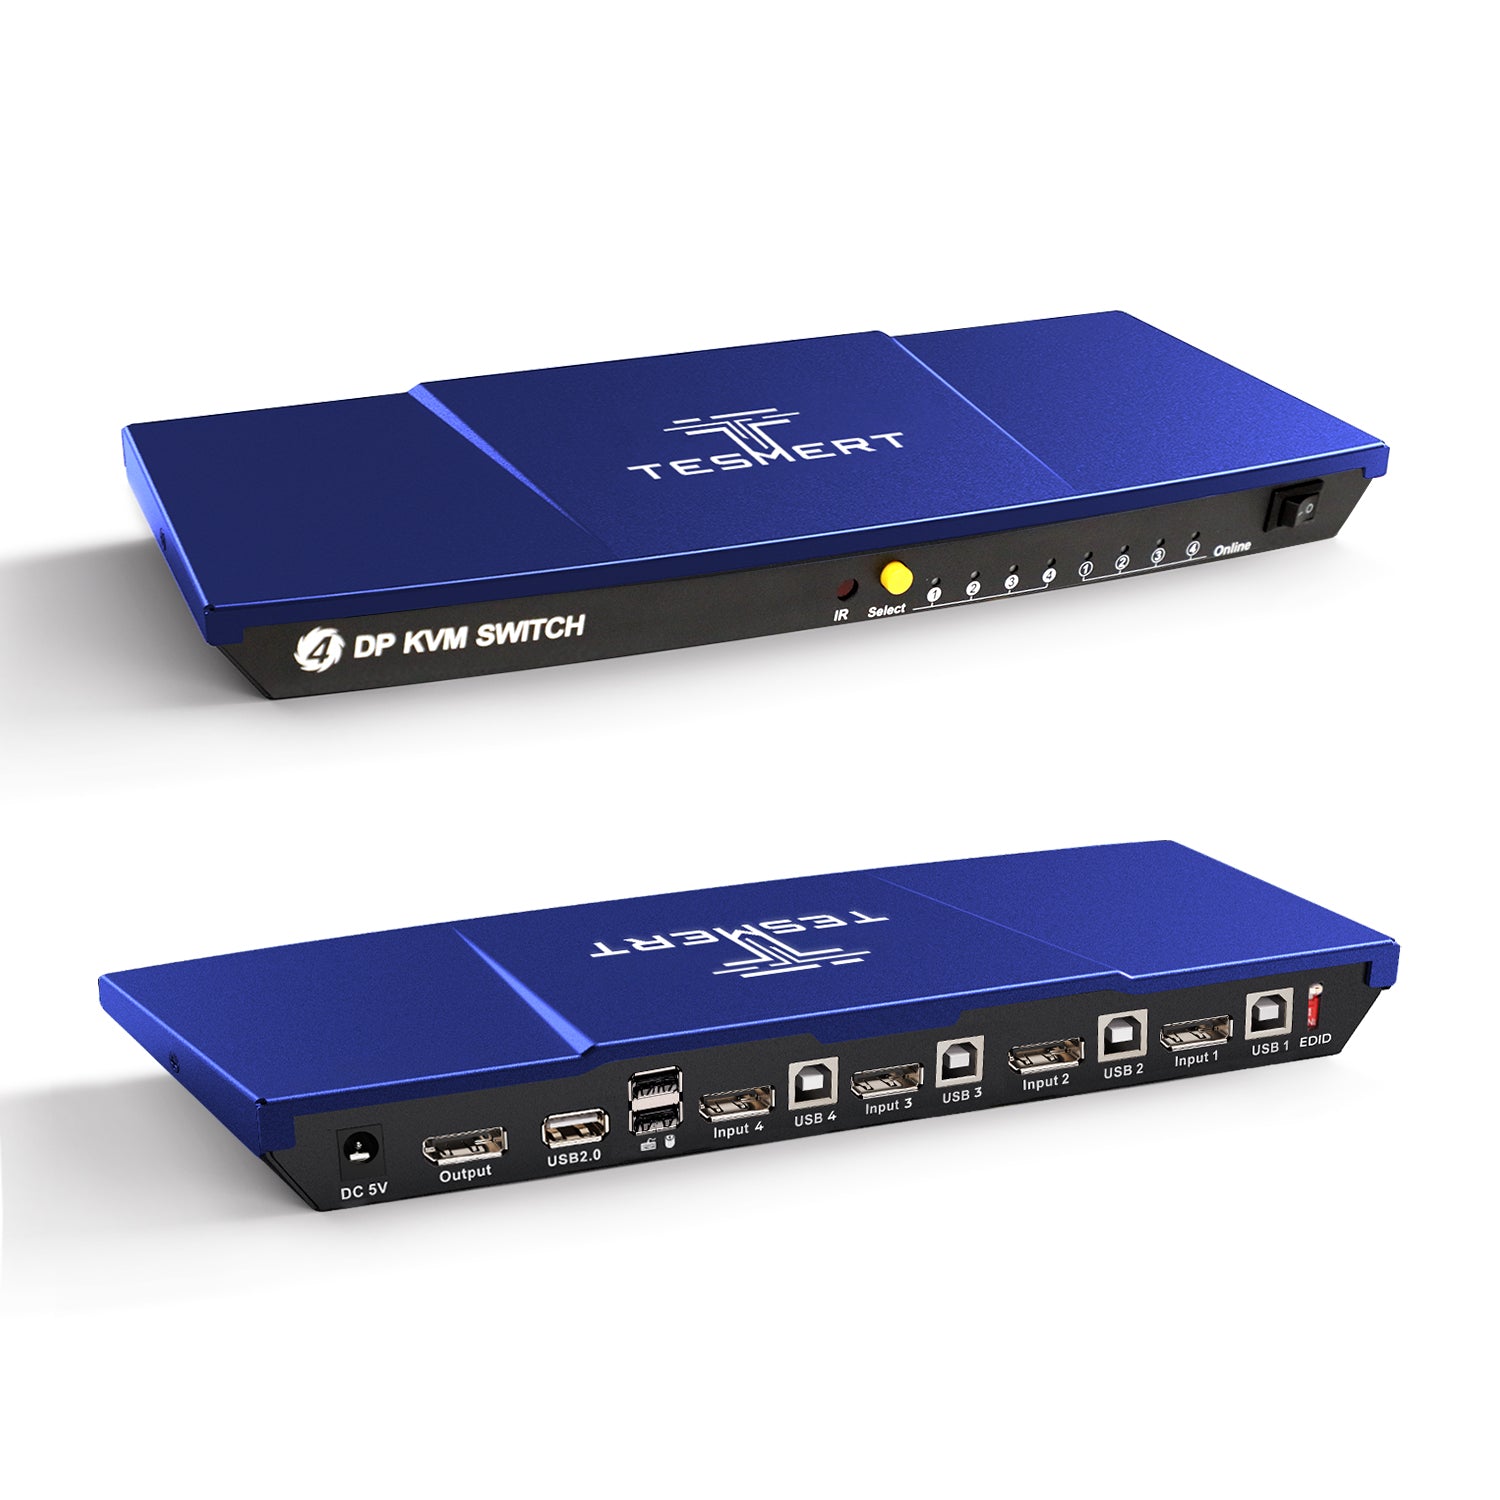
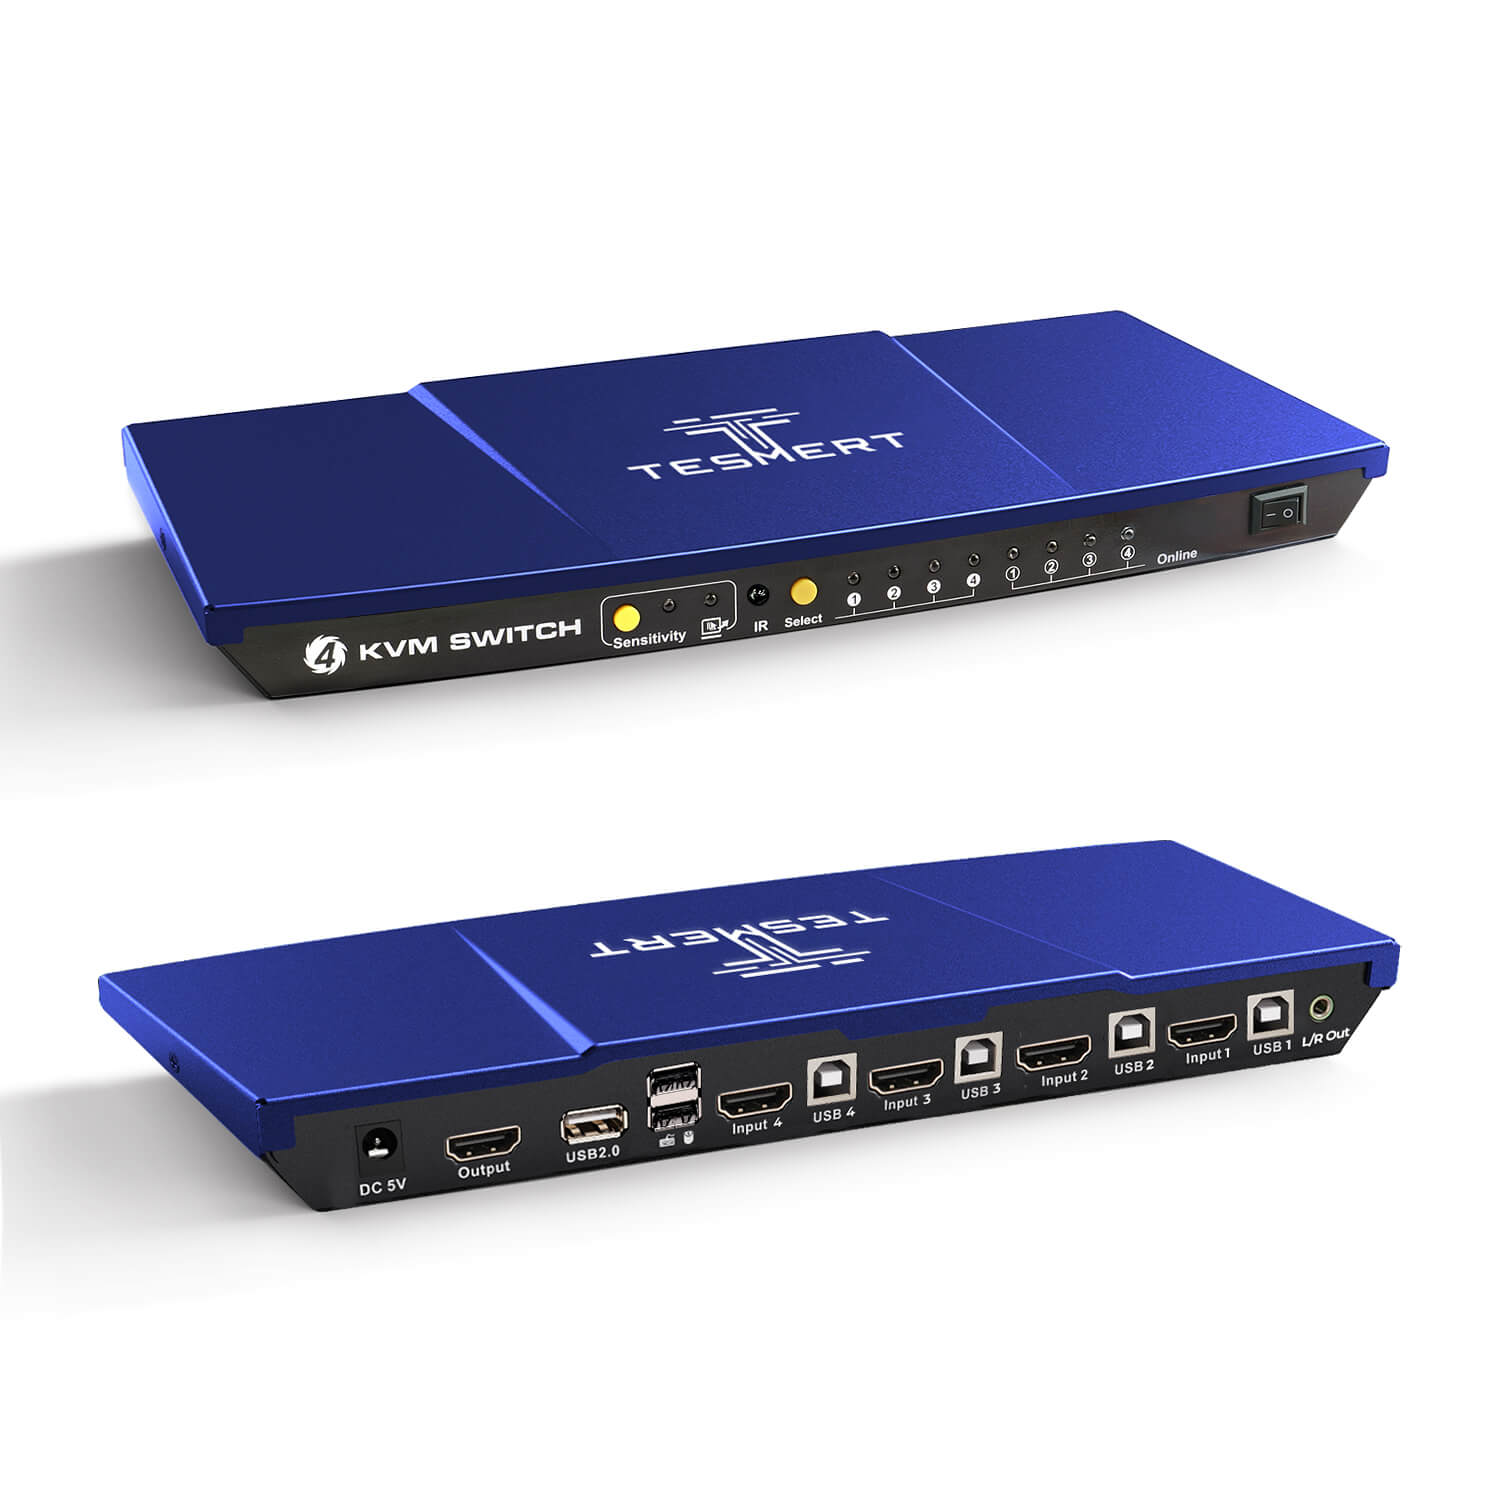
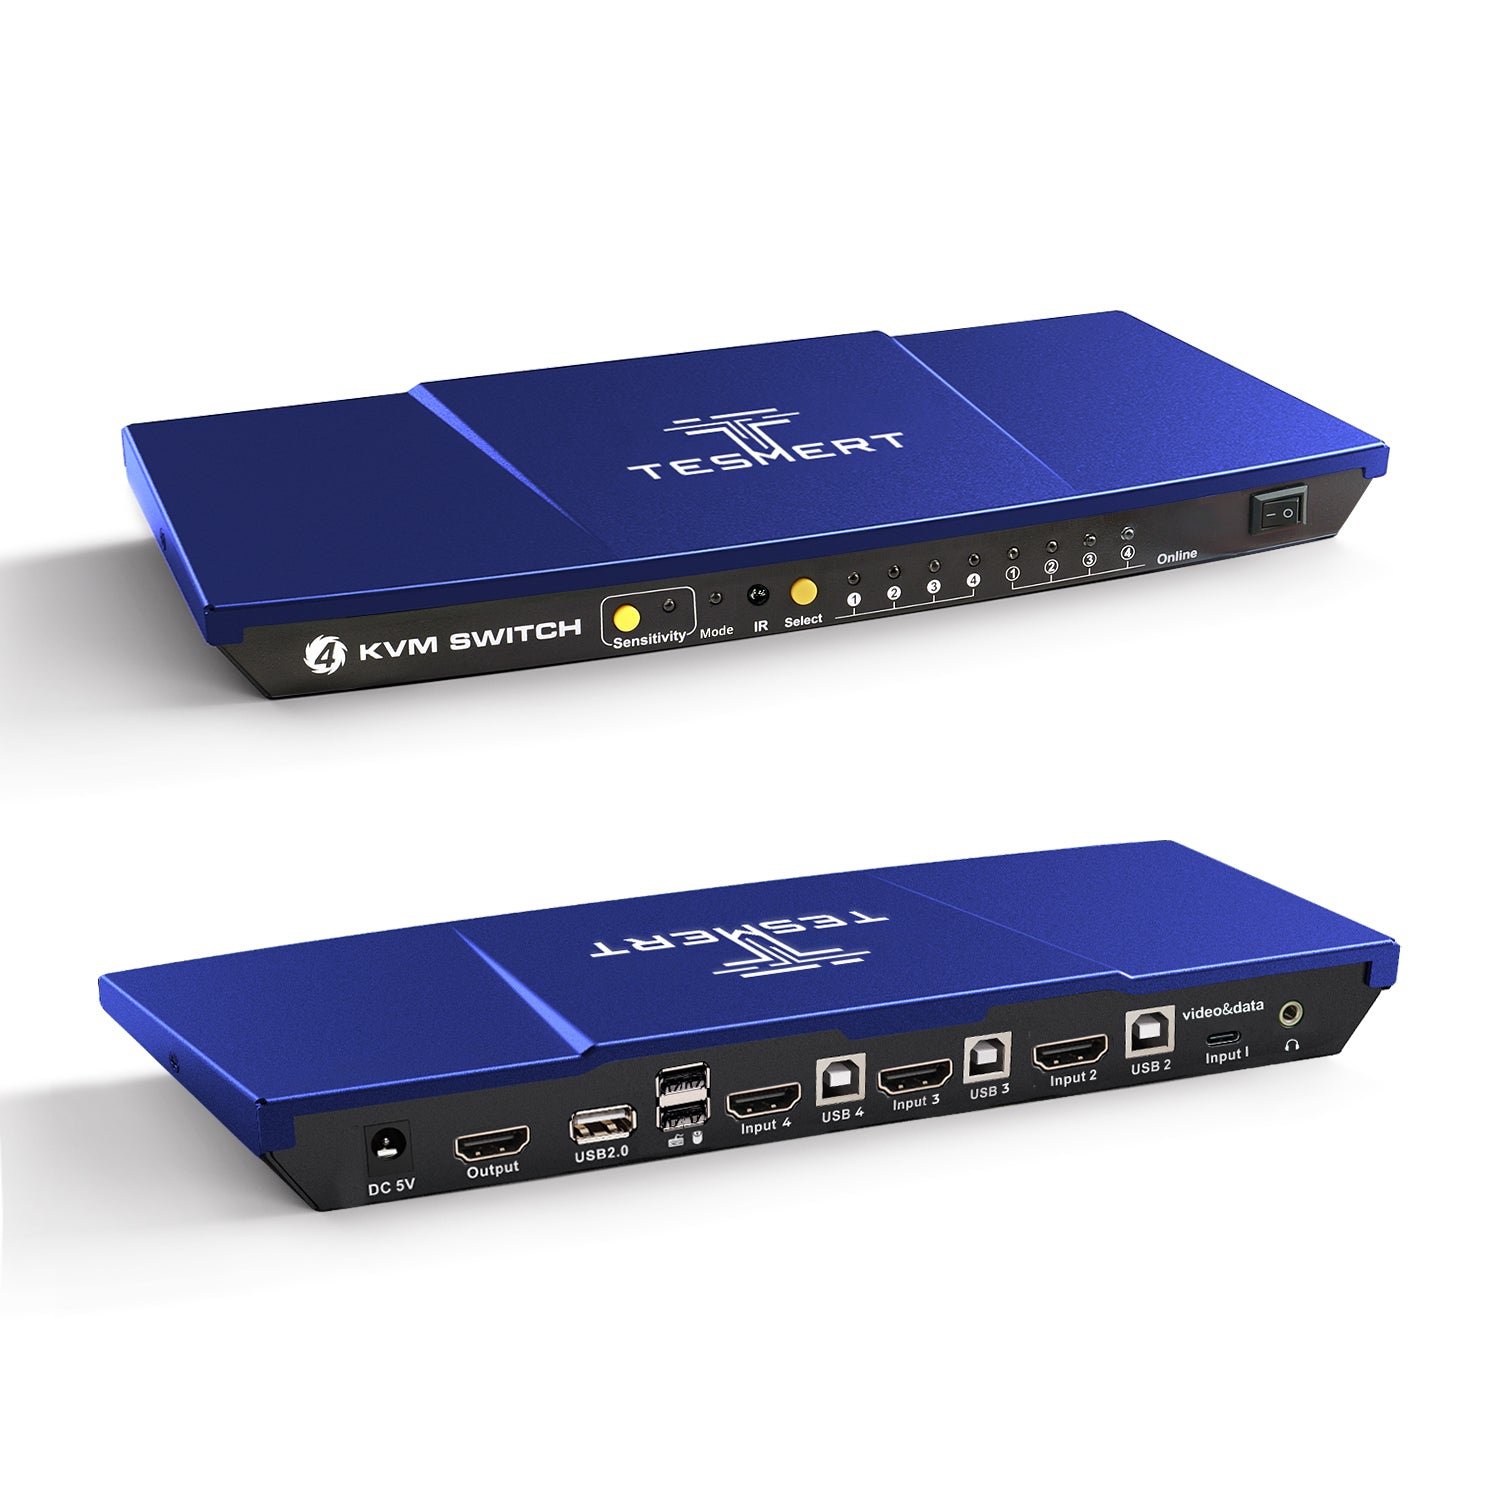
- Computer Inputs
• 4 × DisplayPort 1.4 + USB-B - Display Output
• 1 × DisplayPort 1.4 - Shared Connections
• 2 × Dedicated USB Ports for Keyboard and Mouse
• 1 × USB 2.0 Hub Port
Display Support
- 3840 × 2160 @ 144Hz
- 3840 × 2160 @ 120Hz
- 3840 × 2160 @ 60Hz
- Supports HDR10
- Supports Dolby Vision
System Compatibility
Windows, macOS, Linux (including Ubuntu, Debian, and Fedora), Raspberry Pi OS.
Other Features
- Plug and Play
- Customizable Hotkeys
Physical Specifications
- Aluminum Alloy Top Cover + Steel Base
- Dimensions: 290 × 120 × 30 mm
- Weight: 500 g
Power
DC 5V Power Adapter
Notes
For the best compatiblity, it is better to turn on keyboard and mouse pass through mode. In this mode, the keyboard and mouse are dynamically mapped to computer, so you are able to use special keyboard and mouse that with multimedia keys or other customized keys.
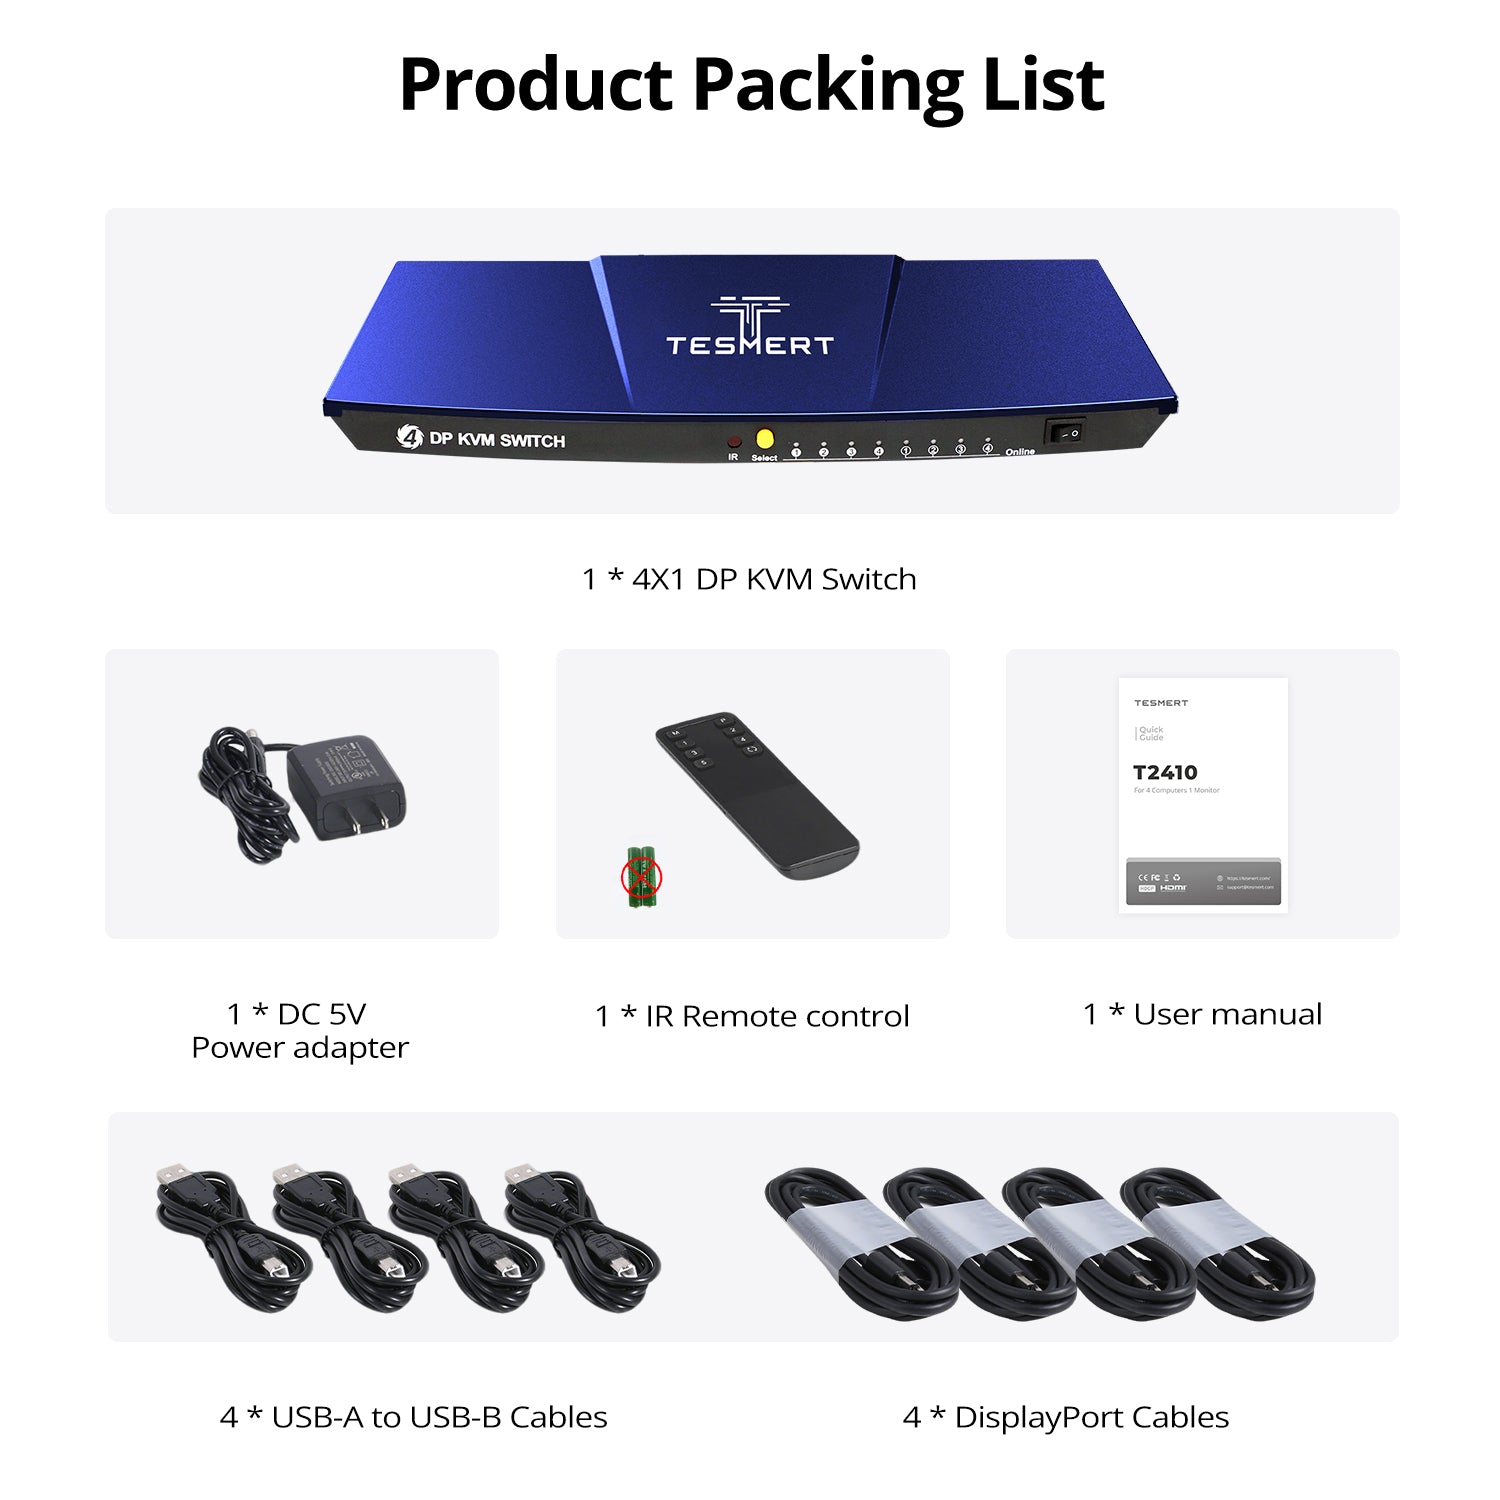
Included in the Box

1 * T2410 KVM Switch

4 * DisplayPort 1.4 Cables (1.8m)

4 * USB-A to USB-B Cables (1.5m)

IR Remote Control

DC 5V Power Adapter

User Manual
Product comparison
Amount of Computers
4
Amount of Computers
4
Amount of Computers
4
Amount of Monitors
1
Amount of Monitors
1
Amount of Monitors
1
Video Type
DisplayPort 1.4
Video Type
HDMI 2.0
Video Type
HDMI2.0 + USB-C
Max Resolution
5K120Hz/4K144Hz
Max Resolution
4K60Hz
Max Resolution
4K60Hz
EDID Emulation
YES
EDID Emulation
YES
EDID Emulation
YES
Special Features
USB-A 2.0 Sharing Port * 1
Hot Plug
Passthrough Mode
Special Features
USB-A 2.0 Sharing Port * 1
Hot Plug
Passthrough Mode
L/R Out
Special Features
USB-A 2.0 Sharing Port * 1
Hot Plug
Passthrough Mode
L/R Out
FAQs
Please read our FAQs page to find out more.
Will my windows and display settings stay in place when I switch computers?
Yes. T2410-V2 includes built-in EDID emulation for each computer input. With EDID enabled, the connected computers continue to detect the monitor even when they are not the active source. This helps prevent resolution changes, desktop resizing, and application windows moving after you switch computers.
EDID is enabled by default, and we recommend keeping it enabled for normal use. If you experience an unusual display compatibility issue, you can temporarily disable it using the EDID switch on the rear panel.
Does T2410-V2 support 4K at 144Hz and 5K at 120Hz?
Yes. T2410-V2 supports resolutions up to 3840 × 2160 at 144Hz and 5120 × 2880 at 120Hz through DisplayPort 1.4, provided that your computers, graphics cards, monitor, and DisplayPort cables all support the required resolution and refresh rate.
It also supports HDR10 and Dolby Vision. For the most reliable high-resolution, high-refresh-rate performance, use direct DisplayPort connections and certified DisplayPort 1.4 cables. Adapters, docking stations, or lower-bandwidth cables may reduce the available resolution or refresh rate.
Will my gaming keyboard, programmable mouse, or wireless receiver work?
T2410-V2 works with most standard wired keyboards, mice, and 2.4GHz wireless USB receivers. Its built-in Pass-Through Mode improves compatibility by allowing the keyboard and mouse to behave more like devices connected directly to the computer. This can provide better support for multimedia keys, programmable buttons, macros, and other advanced functions.
For normal hotkey operation, connect the keyboard and mouse to the dedicated keyboard and mouse ports. If a specialty keyboard does not work correctly through the dedicated port, try connecting it to the shared USB 2.0 port instead.
Bluetooth keyboards and mice that do not use a USB receiver cannot connect through the KVM.
How can I switch between the four computers?
T2410-V2 offers several switching methods:
- Front-panel button
- Keyboard hotkeys
- IR remote control
- Mouse gesture
- Mouse wheel
- Auto Scan mode
The default hotkey trigger is Right Ctrl, and it can be changed to Scroll Lock. Keyboard hotkeys only work when the keyboard is connected to the dedicated keyboard and mouse port.
Which USB devices can I share between the four computers?
T2410-V2 includes one shared USB 2.0 port that follows the selected computer. It is suitable for everyday USB peripherals such as:
- USB flash drives
- Printers
- Barcode scanners
- Basic USB audio devices
- Standard USB receivers
- Other USB 2.0 accessories.
The USB 2.0 connection supports up to 480Mbps in theory. For external SSDs, capture cards, high-resolution webcams, or other bandwidth-heavy devices, connect them directly to the computer or use a separate high-speed USB hub.
Can I connect laptops or computers without a full-size DisplayPort output?
Yes, provided the computer can output a compatible DisplayPort video signal.
A USB-C laptop can be connected using a USB-C to DisplayPort cable or adapter, but the laptop's USB-C port must support video output through DisplayPort Alt Mode. You will still need a separate USB connection between the laptop and the KVM for keyboard, mouse, and shared USB control.
For HDMI-only computers, an active HDMI-to-DisplayPort converter may be required. Passive cables are not always suitable because HDMI-to-DisplayPort conversion is directional, and adapters may reduce the maximum available resolution or refresh rate.
Also note that T2410-V2 is a four-computer, one-monitor KVM. It does not provide four monitor outputs or a separate monitor for each computer.
Are the required cables included, and is setup complicated?
No software or drivers are required. Each computer connects to the KVM using:
- One DisplayPort cable for video,
- One USB-A-to-USB-B cable for keyboard, mouse, and shared USB control
The package includes:
- T2410-V2 KVM switch
- Four DisplayPort cables
- Four USB-A to USB-B cables
- IR remote control
- DC 5V power adapter
- User manual
The included cables make the initial setup easier, but connecting four computers creates a large number of cables. Leave enough space behind the unit and label each DisplayPort and USB cable by computer before installation.